- Call us: 01444 237070
- Contact Us
- Stores
- Sign In / Register
-
- Back
- Used Cameras
- Used Accessories
- Used Lenses
- Used Video
- Used Film Equipment
- Used Stock Alert
- Used Blank Test
- Sell or Part Exchange
- Used Clearance
- Recently Added Used Equipment
- Park Picks
- All Used Black Friday Deals
- Faulty
- Used Week Offers
- Back
- Trade-In
- Blog
- New in
- Call us
- Contact us
- Stores
- Sign in
- Categories
- Tips & Inspiration
- Reviews
- News
- Events
- Features
- Buying Guides
- Competitions
5 Composition Mistakes Every Photographer Makes
Composition, in essence, is the basis of the art of photography, controlling the two central principles of the medium – technical accuracy and creative impact. It can be the defining factor of a brilliant photo, with both traditional compositions and unique creative twists resulting in powerful shots.
5 Composition Mistakes Every Photographer Makes | Tutorial Tuesday Video
We all make mistakes, which Gareth explains is a good thing in this tutorial video, as it helps us learn and get better at what we do. This is also true with photography, so he's running through five composition mistakes that we all make, and how we can overcome them.
However, it can perfect an image as quickly as it can ruin it. Compositional blunders can haunt even professional photographers - these are those classic errors where you wish you could go back to retake the same photo. While some errors can be sorted out in post, nothing’s better than nailing your compositions first-time.
As photographers, no matter how experienced, we’re constantly learning from our mistakes. We’ve compiled this list of five composition mistakes we all struggle with so that you can keep them in mind every time you go to take your photos. Read on, as we discuss what makes them so regrettable and the best photography tips to avoid them on your shoots.
Tip 1: Straightening the Horizon
One familiar compositional error arises from not paying attention to your horizon. Keeping your shots level is crucial in almost all forms of photography – as a rule of thumb in photography, it ensures your images feel natural and balanced.
A crooked horizon interrupts the harmony of your composition as it makes elements look off-kilter and lopsided. It also easily distracts the viewer, a big compositional blunder that can dampen your photo’s impact.
This error usually arises from problems with your process. Awareness of your horizon’s impact on your composition requires practice and developing an eye for a level shot, which may take a while for beginners to grasp. Other factors like impatience and distraction can plague any photographer and mean the horizon doesn’t enter your head.

Sony A7 IV | Sony FE 20-70mm f4 G | 1/320 sec | f/8 | ISO 250
Try to keep your horizon level for almost all cases. While you can sort a skewed horizon line relatively quickly in post, nailing it in-camera will speed up your editing process, avoid having to crop your image and reduce your reliance on post-production. Ensuring your horizon is straight isn’t difficult, so practice and perfect it!
As with most compositional principles, you can always bend this rule as long as you’ve got justification as to why you’re breaking it. Usually, being deliberate and creative with your composition is better than not considering your approach, whether you’ve broken or adhered to the rules.
Most digital cameras have a built-in levelling indicator, which could come in incredibly handy if this is something that you struggle with, especially as a beginner. It’s always worth making the most of your camera’s additional quality-of-life features to make your photography that much easier.
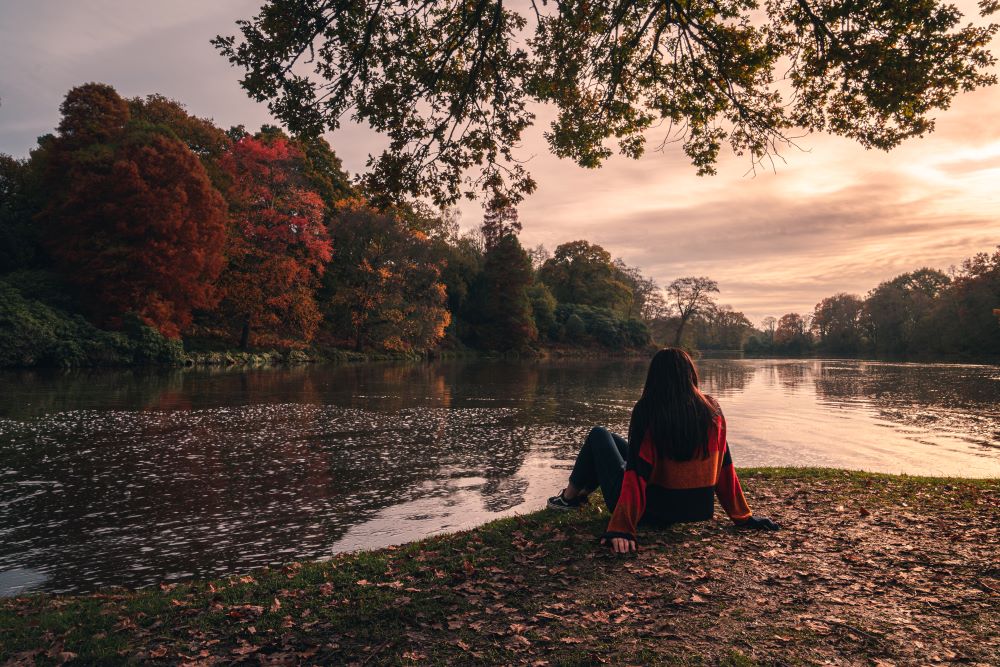
Tip 2: Negative Space
Negative space is a vital aspect of your composition. As opposed to positive space (the subject of your image), negative space refers to its surrounding area. Nailing the balance between these two elements takes a lot of practice and requires an eye for a strong composition.

Sony A7 III | Sony FE 24-70mm f2.8 GM | 1/160 sec | f/2.8 | ISO 100
With genres like portrait photography where you’re looking to emphasise your subject, it can be tempting to shoot very close – the resulting bokeh and lens compression produce beautiful shots. However, sometimes, the pull of these features can distract you from considering the balance between positive and negative space.
Negative space gives your subject breathing room. This leaves your photos feeling much more natural and far less claustrophobic – you must provide your viewer’s eye with enough space so that your photos make for comfortable viewing. Keeping your shots natural and welcoming to the eye is, in essence, the art of composition.
If positive space dominates your shot, you miss out on a sense of scale, balance, and direction in your photo. Especially with portraits, giving your subjects more space in their surroundings provides context and makes for a shot that makes more sense. Sometimes, these factors can be integral to a powerful composition. In the same vein, too much negative space may give the eye too much room to wander and weaken the impact of the subject.
Sony A7 III | Sony FE 24-70mm f2.8 GM | 1/200 sec | f/11 | ISO 200
For every subject you shoot, capture some wider, establishing shots. These give you some context to work with and ensure that when you return to your photos, you’re not frustrated that you can’t expand your frame. By doing this, you may also find a preferable composition that relies on the power of negative space.
Giving your subject room in your shot is also a great fail-safe if you’d prefer a different result to your shots. While you can always crop in further to reduce negative space, expanding a shot isn’t possible without using some pretty complex post-production tools or even modern enhancements through Generative AI. While its effectiveness is hotly debated, there’s no denying that keeping your shot 100% authentic is best.
Tip 3: Cutting Off Subjects
This mistake is essential to avoid for portraiture and relates in a way to our previous tip. Cutting off your subjects in your shot often plagues portrait photographers, but is crucial to consider in almost all styles of photography. Framing someone’s body perfectly in a shot requires awareness of their limbs, headroom and more.

Sony A7 III | Sony FE 85mm f1.4 GM | 1/200 sec | f/1.4 | ISO 250
Ensuring you don’t cut off your subject at unnatural points is vital in producing a convincing, clean image. For portraits, a good rule of thumb is to never cut them off at the joints – this creates an unnatural look where an uncomfortable amount of context is provided.
This rule is similar to a subject’s headspace. Needless to say, you should never cut your subject off at the head; however, giving them the perfect amount of space between the top border of the photo requires some intuition and judgment. This becomes natural with time and practice.
To remedy this on your shoots, it may be worth capturing a few wider shots to ensure that, at least, you have a selection of images where your subject isn’t cut off at all. If you’re on a portrait shoot, perhaps a couple of full-body photos could act as a fail-safe. This provides you with adequate context about your subject, and the facility to crop in to your liking, made easy by modern image sensors with high megapixel counts.
Tip 4: Centring Subject
As a beginner photographer, centring your subject feels like the most natural thing to do, no matter what you’re shooting. It’s almost automatic when starting out, as you’re likely yet to have explored different compositional ideas. Sometimes, centring your subject can work brilliantly when considering symmetry and negative space, but in other cases, it can be a crutch.

Panasonic Lumix S1 | Panasonic Lumix S 24-105mm f4 | 1/100 sec | f/4.0 | ISO 320
Constantly centring your subject often runs the risk of cutting parts of your subject out – this is especially prevalent in portraits but can occur anywhere. In addition, centring your subject is a simple way for a subject to completely dominate the shot – in some cases, this is effective, but in others, it often creates the wrong impression.
Even though centring your subject can look brilliant, there’s no requirement for you to do it automatically. Sometimes, you may want to experiment with ideas like the rule of thirds, keeping the subject on either side of the centre. This can dictate the feel of the image by balancing the photo, employing negative space and even directing the viewer’s eye a certain way, making for a more compelling composition.
This can be remedied by simply giving yourself time to play with your composition. Powerful ideas can often present themselves if you spend more time with a subject, experimenting and adjusting their position as you go.
While a centred subject can often be impactful, this tip explores breaking out of that habit and exploring new ideas. You can apply this across the board with your photography – breaking habits will undoubtedly make you a more well-rounded, skilful photographer.

Canon EOS R7 | Canon RF 800mm F11 IS STM | 1/400 sec | f/11 | ISO 4000
Tip 5: Not Considering the Subject’s Surroundings
Our last tip involves paying a little more attention to your entire shot. This involves considering all the elements that surround your subject – the background, foreground, colours, leading lines, you name it – and how they add or subtract from the impact of your image.
This pertains mainly to distracting elements in your shot. In almost every shot, you want to be funnelling your viewer’s eye towards the subject you're emphasising. Distracting elements, whether in the foreground, background or otherwise, can ruin this effect.
Often, parts of your shot can be contextually distracting. For instance, if you’re shooting landscape photography, people, animals, plants, objects and even patches of natural light and colour that make no sense within the scene divert attention away from the focus. In a sense, they bulldoze the feel and story of your image too.

Sony A7 III | Sony FE 24-70mm f2.8 GM | 1/160 sec | f/8 | ISO 400
This is the case for all genres of photography. If it fits awkwardly into the composition, do what you can to do away with it! This is best done by adjusting your angles and depth of field to control how much you want the background to be prevalent. Changing your positioning can often take distracting elements straight out of the equation – consider taking your time a little more next time you’re out shooting to identify and handle these issues.
Intersections with background elements are also best to avoid. Leading lines emerging from your subject or cutting through them can be incredibly distracting and even draw the viewer’s eye away from what you’re looking to focus them towards. Allowing your subject to stand alone, separated from parts of the background, will make it much more impactful and give it a far stronger pull.
Even the slightest movements with your camera can correct where these lines meet your subject. A little patience makes you much more likely to pick up on distracting intersections and more, so all you need to avoid this problem is a pinch of mental agility on your shoots.

Hasselblad X2D 100 C | Hasselblad XCD 55V Lens | 1/500 sec | f/2.5 | ISO 100
Summary
With a little awareness, practice and intuition, we can all pick up effective compositional tools to shoot to the best of our abilities. We hope you’ll keep these tips in mind on your next shoot – feel free to explore our social media channels on Facebook, YouTube, X and Instagram where we’re regularly sharing tips just like these.
Discover our vast range of digital cameras, lenses and special offers today – we’re certain you’ll find the perfect companion for your photographic journey.
Share this post:
By Thom Pyle on 22/06/2024

Trade in your old equipment
Fast and easy trade in service ensures your old gear is collected efficiently and you are paid quickly! It's very simple to trade in your unwanted photography gear. Just head over to our dedicated Sell or Part Exchange page, fill out the details, and we'll get back to you with an offer for your old gear. Take the cash, or put it towards the cost of your new gear. It's up to you! Find out more
sign up to the newsletter
Keep up to date on the latest photography news, events and offers. Sign up now