- Call us 01444 237070

-
- Back
- Used Cameras
- Used Accessories
- Used Lenses
- Back
- Used Canon Lenses
- Used Nikon Lenses
- Used Fujifilm Lenses
- Used Sony Lenses
- Used Micro 4/3rds Lenses
- Used Leica Lenses
- Used Panasonic Lenses
- Used Pentax Lenses
- Used Samyang Lenses
- Used Sigma Lenses
- Used Tamron Lenses
- Used Tokina Lenses
- Used Voigtlander Lenses
- Used Zeiss Lenses
- Used Hasselblad Lenses
- Used Video
- Used Film Equipment
- Used Stock Alert
- Used Blank Test
- Sell or Part Exchange
- Used Clearance
- Recently Added Used Equipment
- Park Picks
- Faulty
- Trade-In
- Blog
- New in
- Call us
- Contact us
- Stores
- Sign in
- Categories
- Tips & Inspiration
- Reviews
- News
- Events
- Features
- Buying Guides
- Competitions
Lunar Photography Tips from Jonathan Penberthy
The way I approach lunar photography is very much from a science rather than an art perspective. Generally speaking, I don’t like the moon, simply because I prefer to image deep sky objects, which requires skies as dark as possible, and so the moon, especially when full, is a nuisance.
But when it is out and it is clear, it would seem silly to dismiss the opportunity to image this celestial rock that has such a big impact on all of our lives. It exercises its control over what seems like every element of our being, from the tides, the months, even the school term are dictated by this giant rock of fascination. We should also remember it has the scars to prove it has protected us from stellar visitors for hundreds of thousands, if not millions, of years, and quite possibly it once collided with Earth, and so the eternal dance of our planet and its companion began.
Imaging technique
The theory is that you set up your telescope and mount as normal, run through the procedure of polar aligning, and then either using a computer like the ASIAir, or manually position the scope to look at the moon. However, when imaging a full moon, you run into, or at least I did, a slight issue. The GOTO facility on the night I took these images was struggling to find the moon! I know this sounds absurd, I mean, there it is, a very big bright object in the sky, why can it not find it? It can find the faintest of nebulae, yet struggles with something so obvious. Well, this is where the science comes in. Despite the amazing ZWO ASI585MC Pro having its gain (ISO equivalent) set to 0, the moon was so bright it overexposed the whole image, and so the star-counting abilities in the ASIAir could not determine where it was in order to precisely find the object and FOV we wanted.
So to remedy this (with the only filter I had to hand, the Optolong L-eNhance filter [call for pricing], which is really designed for nebula photography), it cut out enough light for it to be ‘safe’ (I wouldn’t recommend this) to remove the camera from the scope and centre the moon manually (yes, I didn’t have my guide scope attached). Once the moon was centred, I locked down the clamps on the mount and then told the ASIAir to track. It was enough to keep the moon in frame, and with the filter in place, enough to not overexpose the image so that I could focus.
Lucky Imaging
As I am sure you may have noticed, England has a fair amount of bad weather, and so it’s no surprise that our atmosphere is also very turbulent. When looking through a telescope, or imaging with a telescope, you will see what looks like water flowing over the lunar surface, like the moon is at the bottom of a swimming pool. This presents a massive issue, parts of your image will look in focus and others out, and then in a split second, other bits are in focus and some that were are no longer. To give you an idea, I am using a ZWO ASI585MC Pro camera with a 420mm Altair Astro Starwave 70ED Telescope (call for pricing), so if we put that into DSLR/mirrorless terms, that would be a full-frame camera with a 1450mm lens!
So, as you can imagine, the slightest breath of wind, the slightest vibration near the tripod, creates shudders that waggle through your imaging train and cause blurring and distortion. To get the best results, you can do one of two things: take a video of the moon (my preference, AVI format works best, 10–30 seconds at around 16 fps is fine [200–300 frames], all at 0 gain), or take a few hundred images. This technique is called ‘Lucky Imaging’. The theory is that over all of the frames, or as astro nerds call them, subs (short for sub-exposures), some part of the lunar or planetary surface that you are shooting will be in focus. Then from this, we can use software to collate not only the best frames but also the parts of each frame, and then stack them all together to produce the sharpest image possible.
The great news is that my preferred software to do this, called AutoStakkert!, is free (a donation is welcome, I believe). For sure, there are a million other ways to do this, but for me, I find this easiest. You can download the software from AutoStakkert.
It is very intuitive to use. Firstly, click ‘1) Open’ and select your images/video, then go through the options. I’ll be honest, generally, I just leave them as the default, but it is fun to play around with. Next, click ‘2) Analyse’. This will now open up another window where you can see your image (it may already be open).
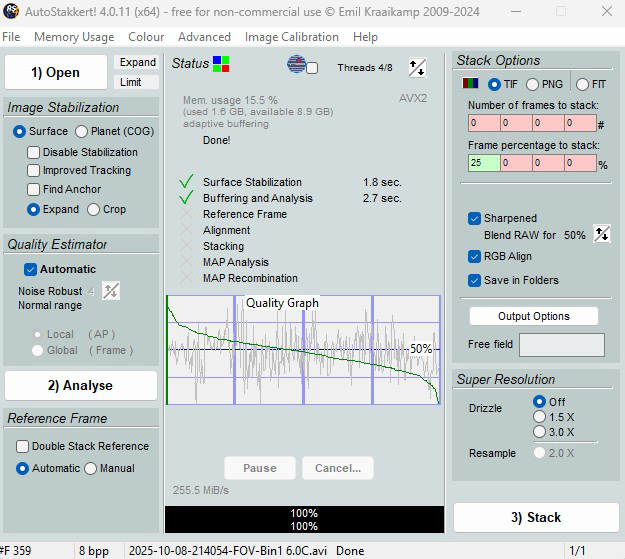
When it has finished analysing, in the second window select the AP (Alignment Point) size, I normally go with 32, and then click ‘Place AP grid’. This will cover the target in squares, each of which will be used to evaluate the image and pick out the best parts. An Alignment Point (AP) is a small region of your image (a patch of pixels) that AutoStakkert! uses to track and correct for distortions caused by atmospheric turbulence (seeing). Instead of trying to align the entire planet or lunar surface as one rigid block, AutoStakkert! divides the image into many APs and aligns each one individually. This technique is called Multi Alignment Point (MAP) processing, and it’s one of the reasons AutoStakkert! produces such sharp planetary and lunar stacks.

Then return to the first window and look at the central chart to judge what percentage of frames are suitable to use. I generally look at the green line and estimate the percentage that is in the top quartile of the first column; in this example, I estimate 25%. I then write this value in the bottom left of the group of eight red and green boxes in the top right-hand corner, having selected ‘TIF’ as my preferred output format so that I can edit in Photoshop later. Obviously, you can fill these boxes in as much as you like and it will create up to sixteen images at a time, but I just stick with one.
Next, select ‘Sharpened’. Generally, I leave the ‘Blend RAW for’ at 50%, but as you will see below, it came out a bit pixelated on a close crop, and so I set this to 90%. You can experiment with drizzle, this effectively works because your telescope is naturally dithering with the atmosphere, and so the same bit of the moon is unlikely to be imaged by the same pixel on your sensor. Using an algorithm, the software can work out the ‘missing’ pixels and give you a much higher resolution image, but obviously, the file will be however many times bigger depending on what you have selected.
Last of all, click ‘3) Stack’. Sit back; depending on how many frames you asked it to stack, this may take a while.
When it has finished, you will find in the folder where you uploaded your images a new folder with the new images inside. If, like me, you selected the ‘sharpened’ option, it will add another image with the same name, but with _conv in it. It is quite interesting to see the difference between the two, as you can see below.
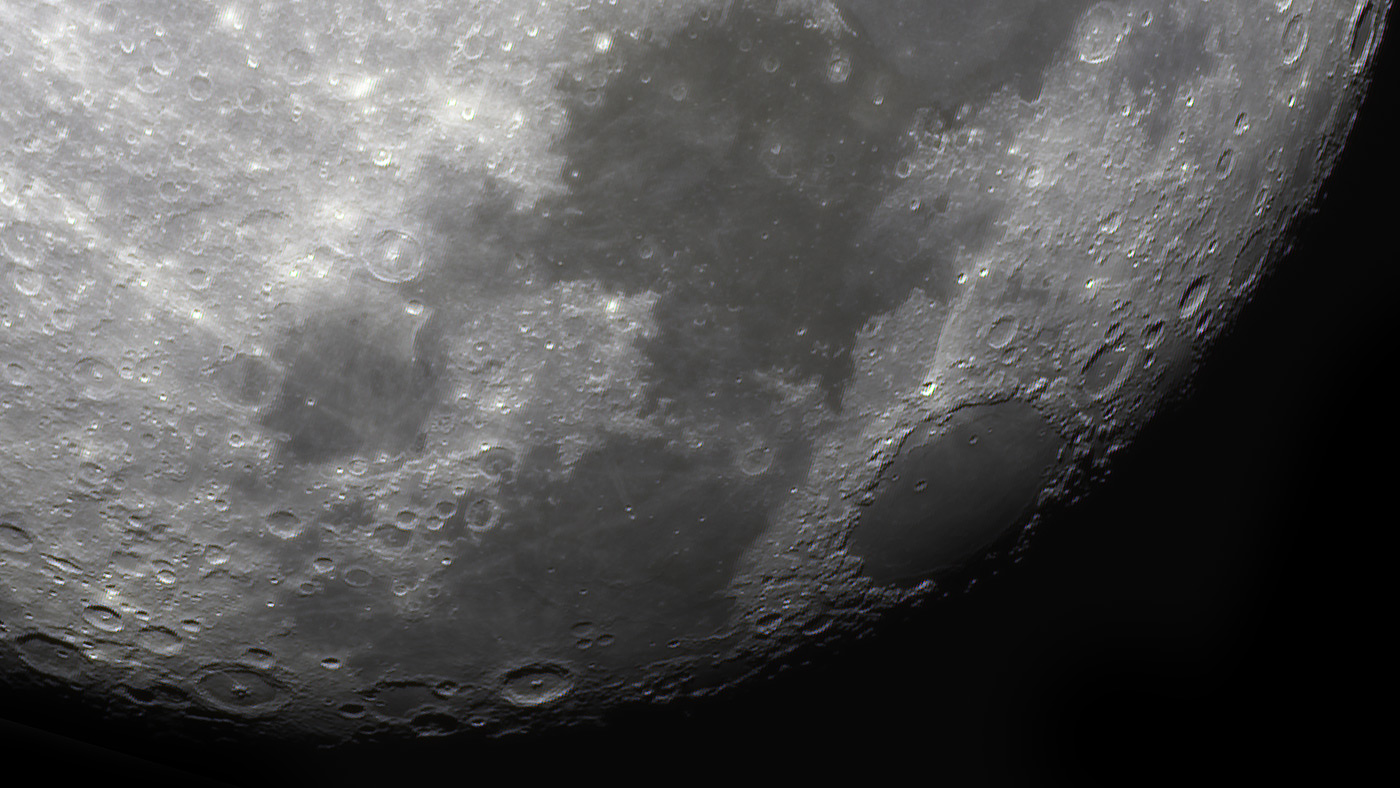
Unsharpened:
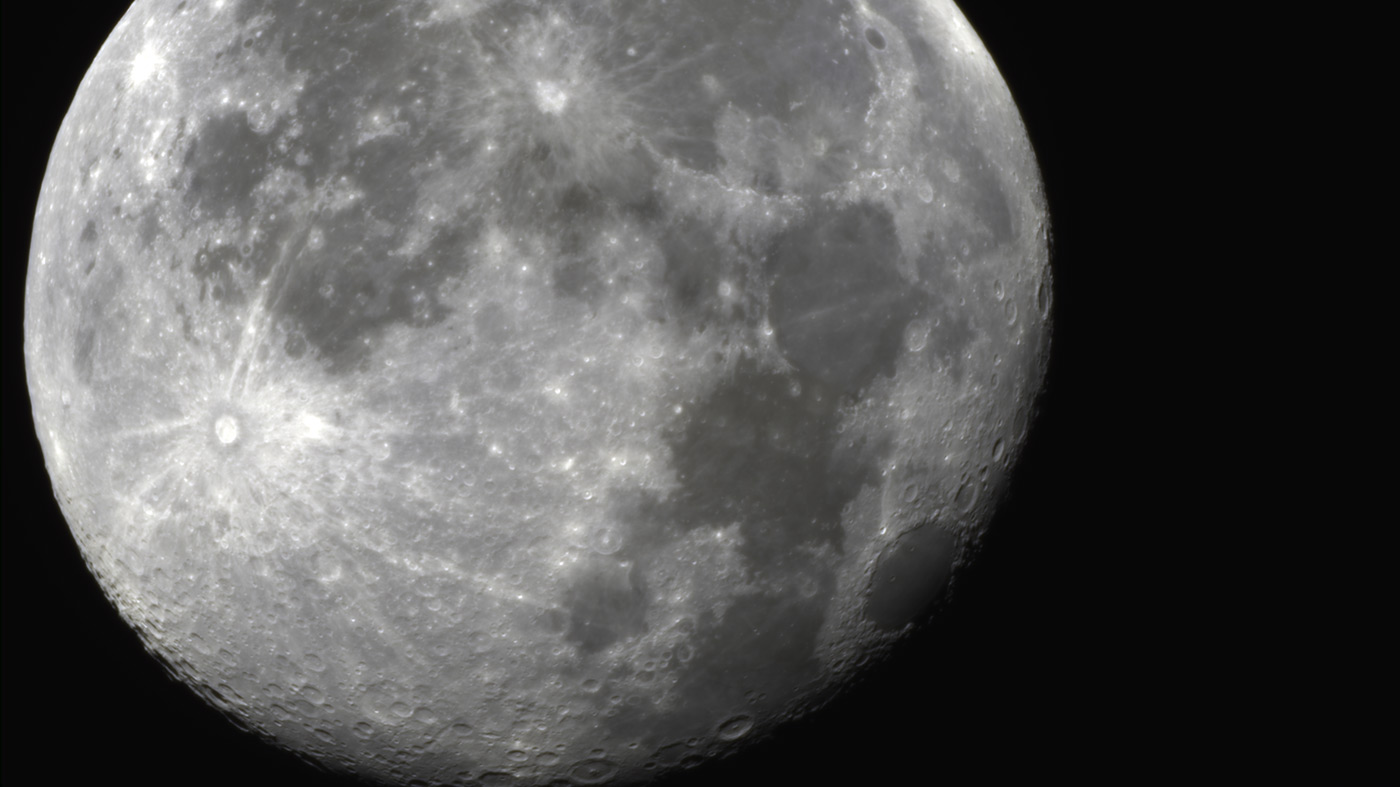
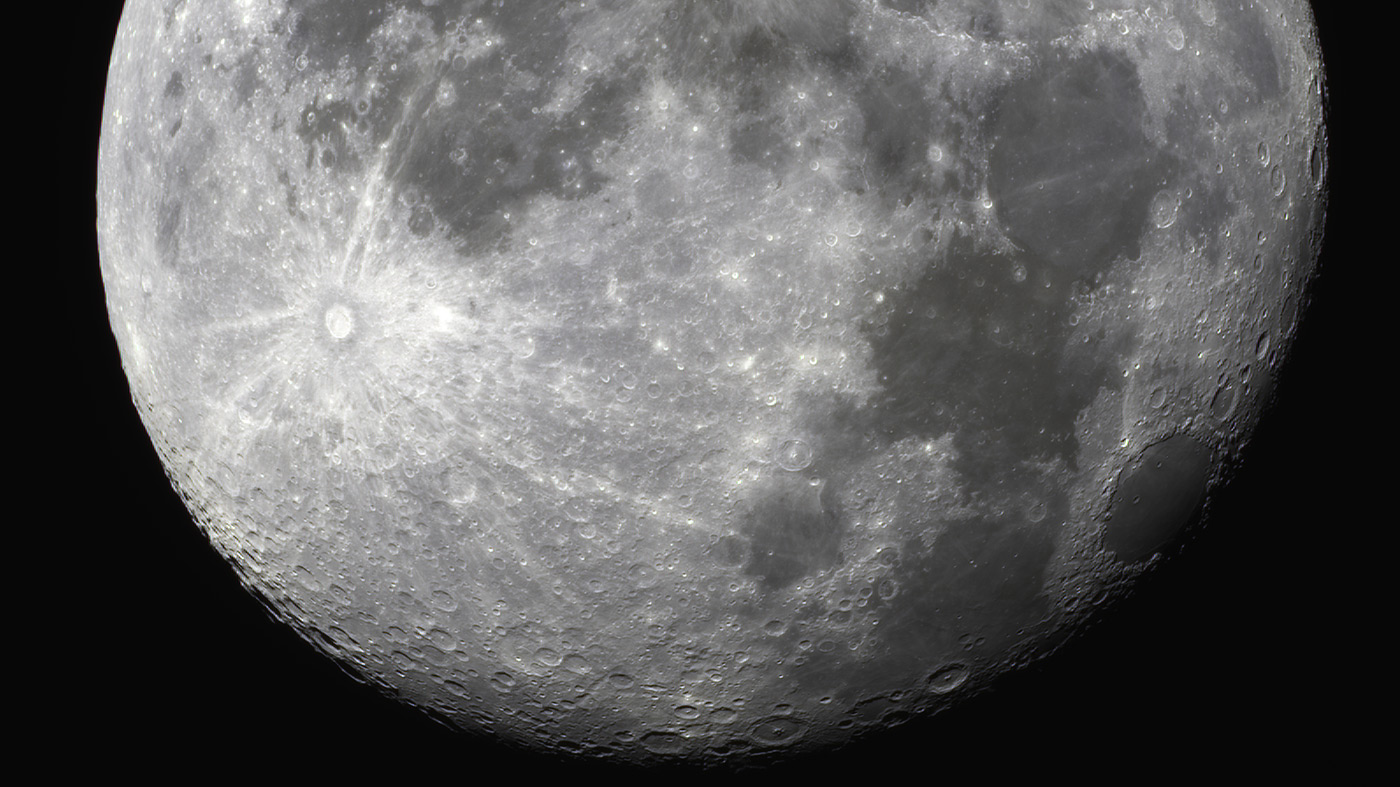
Sharpened (90% Blend, no drizzle)
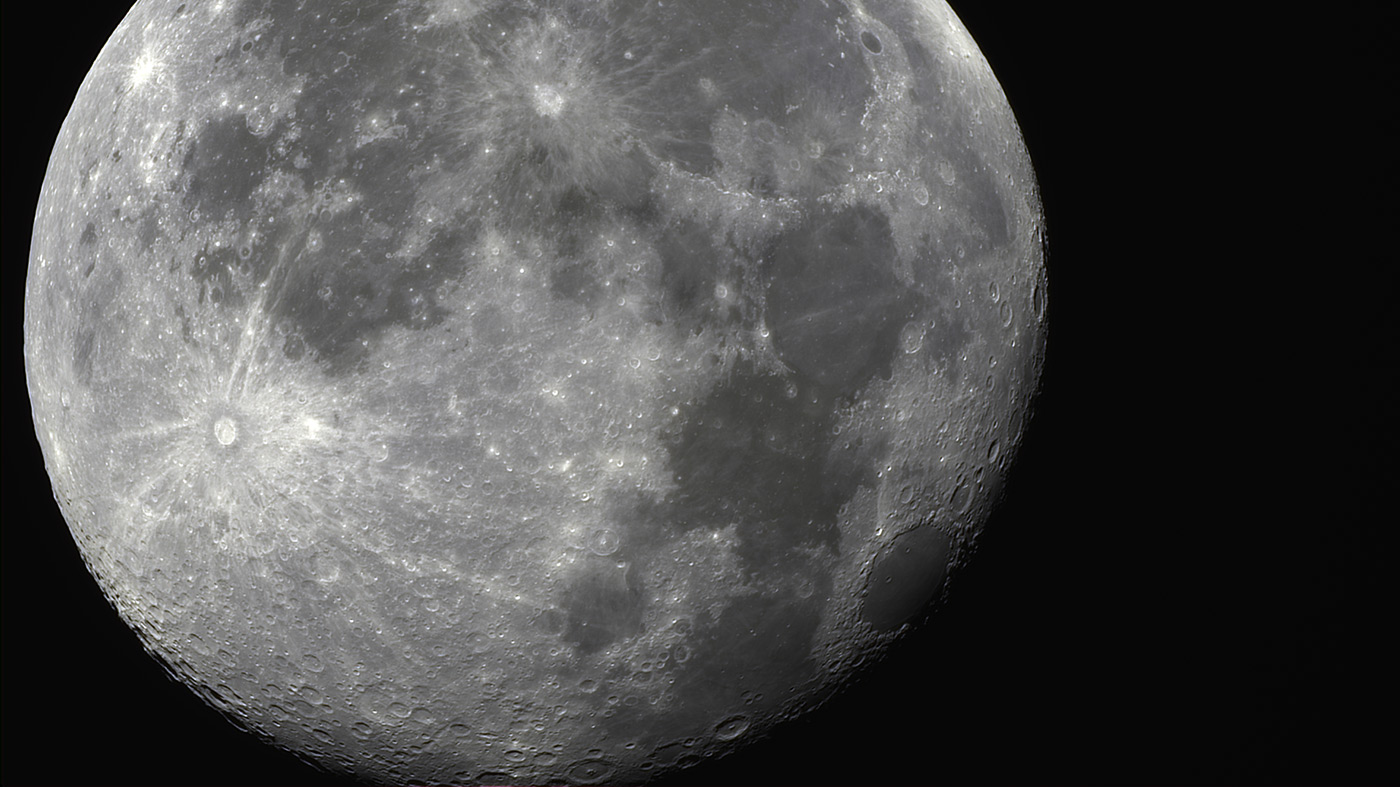
As you can see in the image above, I have opted for a 90% blend, that is because on the 50% blend, upon close crop I could see a crazy amount of pixelation:
Here is an example of the image with drizzle set to 3x and blend at 50%:
EXIF:
Camera: ZWO ASI585MC Pro (https://www.parkcameras.com/shop/zwo-asi585mc-pro-usb30-cooled-colour-cmos-camera_9800955w).
Telescope: Altair Astro 70ED Telescope (420mm) (Call for pricing).
Mount: Sky-Watcher EQ5 Pro StellarTuned (Call for pricing).
Filter: Optolong L eNHance (Call for pricing).
Computer: ZWO ASIAIR pro
Method:
Lights: 22 second video at around 16 fps, Gain 0. 359 frames total - 25% (90 frames) stacked.
Darks: 0
Flats: 0
Bias: 0
Stacked in AutoStakkert!, colour balance and light contrasting in Photoshop.
We’ve got lots more astro tips and inspiration in our blog.
Share this post:
By Jonathan Penberthy on 09/10/2025
Jonathan Penberthy
Cosmic Shutter Seeker and Star Programmer
Jonathan Penberthy is the Cosmic Shutter Seeker and Star Programmer at Park Cameras, with over 20 years of experience as a software engineer. His career journey has spanned industries, but a move to Park Cameras sparked a passion for astrophotography. Jonathan’s interest began while working on a lens selection app, leading him to explore the night sky with a Canon 7D. When he’s not programming or photographing the stars, he enjoys sailing and navigating by the cosmos. Learn more on his profile page.

Trade in your old equipment
Fast and easy trade in service ensures your old gear is collected efficiently and you are paid quickly! It's very simple to trade in your unwanted photography gear. Just head over to our dedicated Sell or Part Exchange page, fill out the details, and we'll get back to you with an offer for your old gear. Take the cash, or put it towards the cost of your new gear. It's up to you! Find out more
sign up to the newsletter
Keep up to date on the latest photography news, events and offers. Sign up now