- Call us 01444 237070

-
- Back
- Used Cameras
- Used Accessories
- Used Lenses
- Back
- Used Canon Lenses
- Used Nikon Lenses
- Used Fujifilm Lenses
- Used Sony Lenses
- Used Micro 4/3rds Lenses
- Used Leica Lenses
- Used Panasonic Lenses
- Used Pentax Lenses
- Used Samyang Lenses
- Used Sigma Lenses
- Used Tamron Lenses
- Used Tokina Lenses
- Used Voigtlander Lenses
- Used Zeiss Lenses
- Used Hasselblad Lenses
- Used Video
- Used Film Equipment
- Used Stock Alert
- Used Blank Test
- Sell or Part Exchange
- Used Clearance
- Recently Added Used Equipment
- Park Picks
- Faulty
- Trade-In
- Blog
- New in
- Call us
- Contact us
- Stores
- Sign in
- Categories
- Tips & Inspiration
- Reviews
- News
- Events
- Features
- Buying Guides
- Competitions
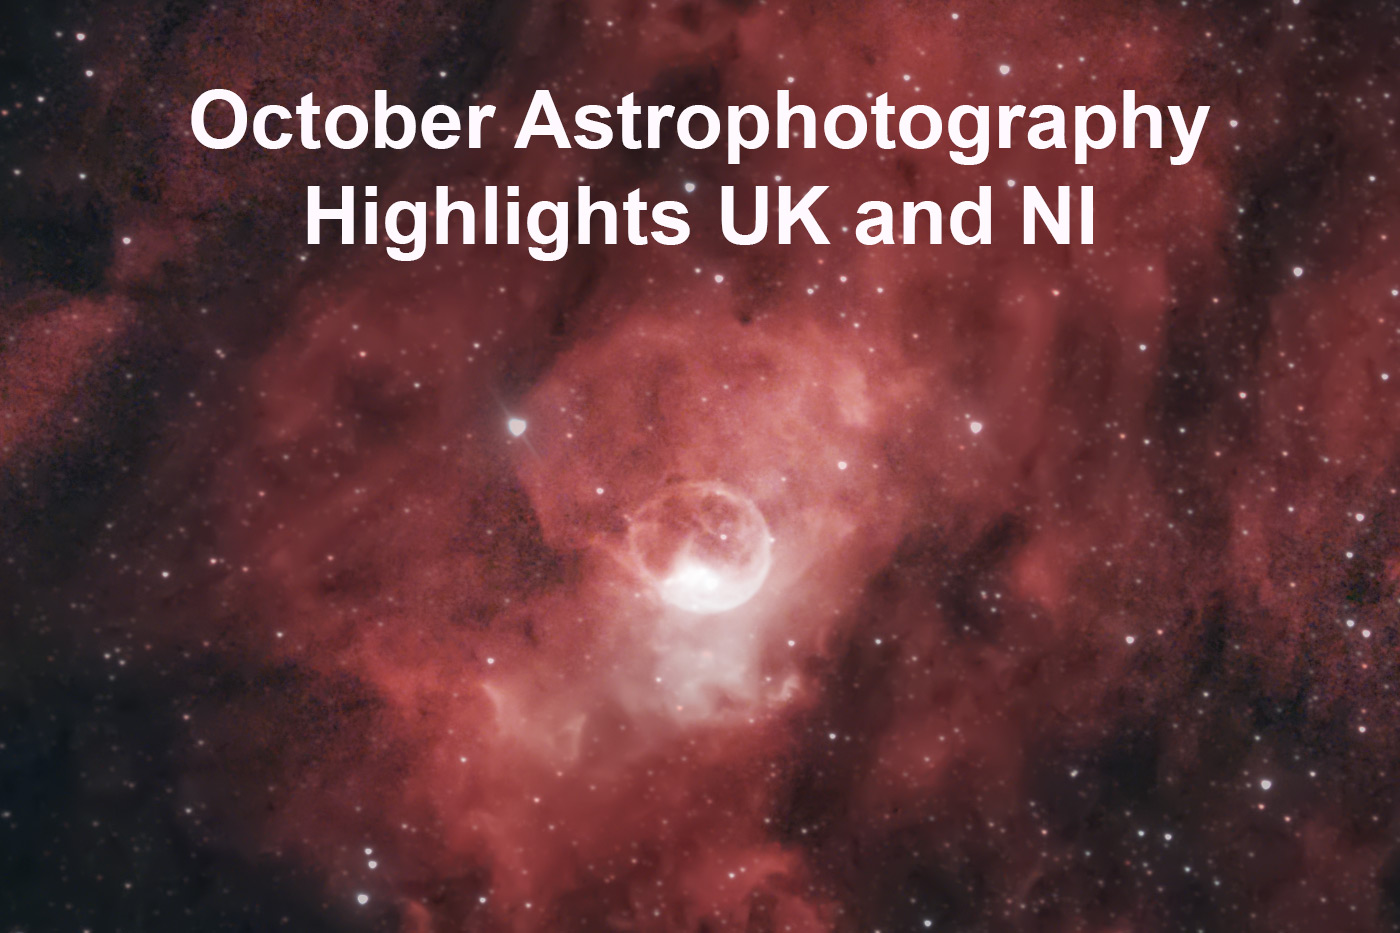
October Astrophotography Highlights UK and NI
What a busy month September has been, my EQ5 mount was out of commission whilst the Inter-Galactic Star Leader of Mount Tuning, the legend that is David Woods (https://www.darkframeoptics.com/) StellaTune my mount (more about this later). My Astro club (Worthing Astronomers) had a very well attended (250+) pop-up event on 7th September for the Lunar Eclipse (also more later), and lastly Epson very kindly printed some off a couple of my pictures using a few of their amazing printers!
October promises to be a fantastic month too, Worthing Astronomers has another pop-up planed for NASA's International Observe the Moon Night on 3rd and 4th October - click here to find your nearest event, or come and join us on Worthing Beach! https://moon.nasa.gov/observe-the-moon-night/. A few comets are in view as well, and I shall if I have chance try to capture these!
Orion and all the wondrous targets it has, is now within easy reach, rising above the horizon in early October shortly after midnight, welcomed to the sky by Pleiades and Torus proceeding it. Not to mention Auriga with its magnificent targets like the Tadpoles and Flaming Star Nebulae.
Kit update:
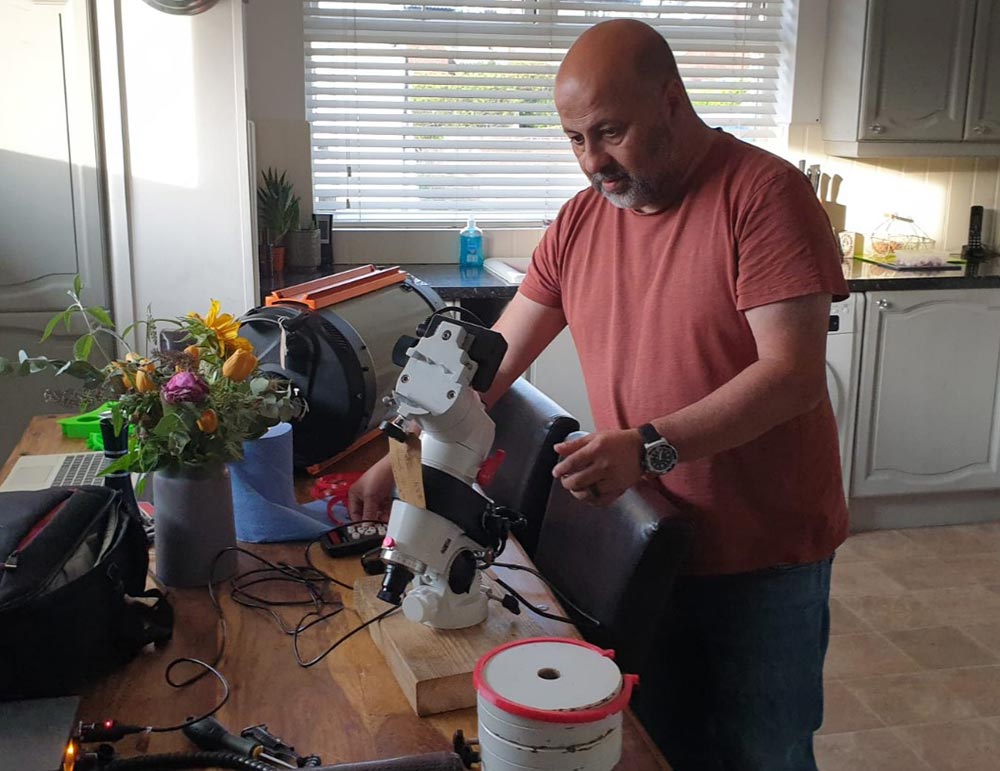
David Woods took my under-performing stock Sky-Watcher EQ5 Pro mount, with its crazy amount of backlash and an average 2.5 RMS Error. Completely stripped it down, worked his wizardry, replaced many parts and gave it a full re-grease and
I am now seeing sub 1 RMS Error, and crucially zero backlash. I really can't thank Dave enough for what he has done. If your mount has not had the StellaTune treatment, give him a call! (https://www.darkframeoptics.com/)
This adventure for sure requires a lot of dedication, its not just the kit setting up, the sitting around in cold dark places for hours on end, but at the end of it spending another couple of hours or so processing your harvest from the night. I find that the only way to progress, is to reflect on my current process, to look at how others do things, to research and understand what needs to happen and what is important, beyond anything give it a go, be prepared to fail and never, never give up!
At my clubs hall meeting the month, we had a talk about the astro picture processing software PixInsight by our club leader Steve Goddard. In the talk, I decided to call his bluff, and had some data with me that I wanted him to process. I wasn’t exactly happy with my attempt from the night before, and knew that the data was a bit lacking due to quality and duration, so I saw this as an acid test.
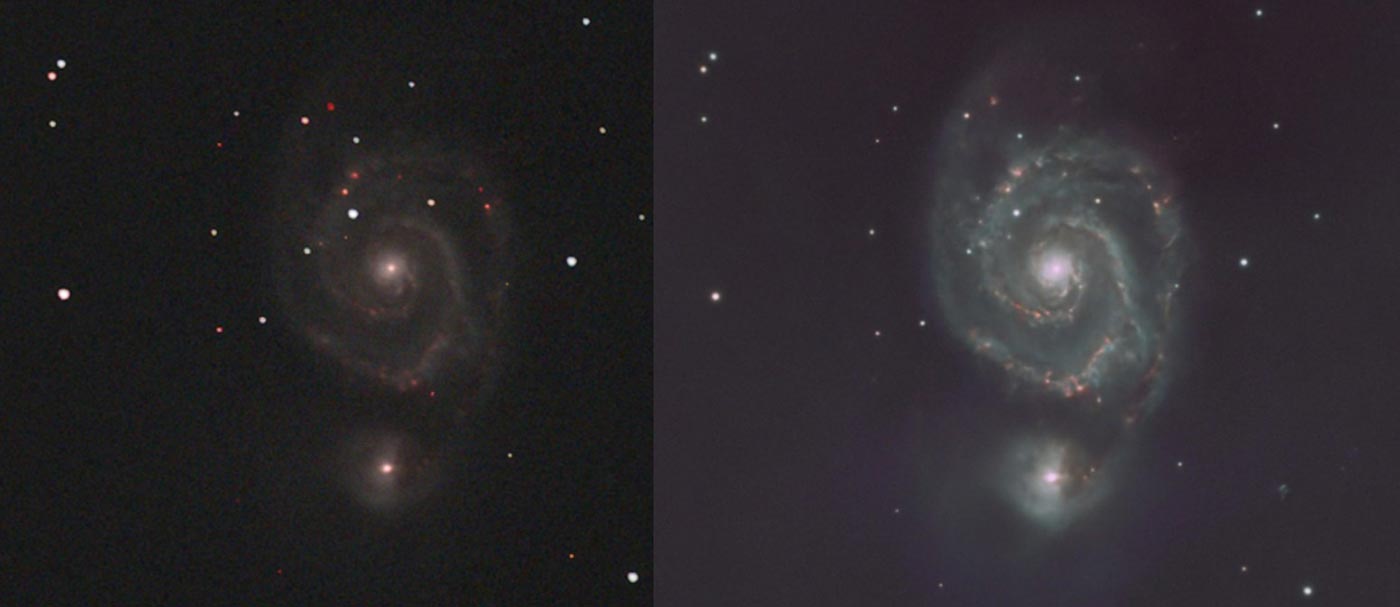
Below you can see my attempt on the left using my normal workflow of Deep Sky Stacker > Siril > Photoshop, and on the right is Steve's workflow using my DSS output file in PixInsight. I will let you be the judge of who nailed it! Or another way to put it: I have registered for a trial licence of PixInsight and will let you know next month how I get on!
EXIF
Camera: ZWO ASI585MC Pro.
Telescope: Altair Astro 70ED Telescope (420mm) + 0.8 reducer.
Mount: Sky-Watcher EQ5 Pro StellaTuned.
Filter: Optolong L eNHance
Guide Camera: ZWO ASI120mm-s
Guide Scope: SVBony 30mm (f4)
Computer: ZWO ASIAIR pro
Method:
Lights: 20 x 120s Gain 252 (Unity).
Darks: 0
Flats: 0
Bias: 0
Stacked in Deep Sky Stacker, Siril for Photometric Colour Calibration and StarNet++ for star removal. Stretched, recompiled and edited in PhotoShop. (Left Image)
Stacked in Deep Sky Stacker, processed in PixInsight (Right Image).
Astro Image Printing
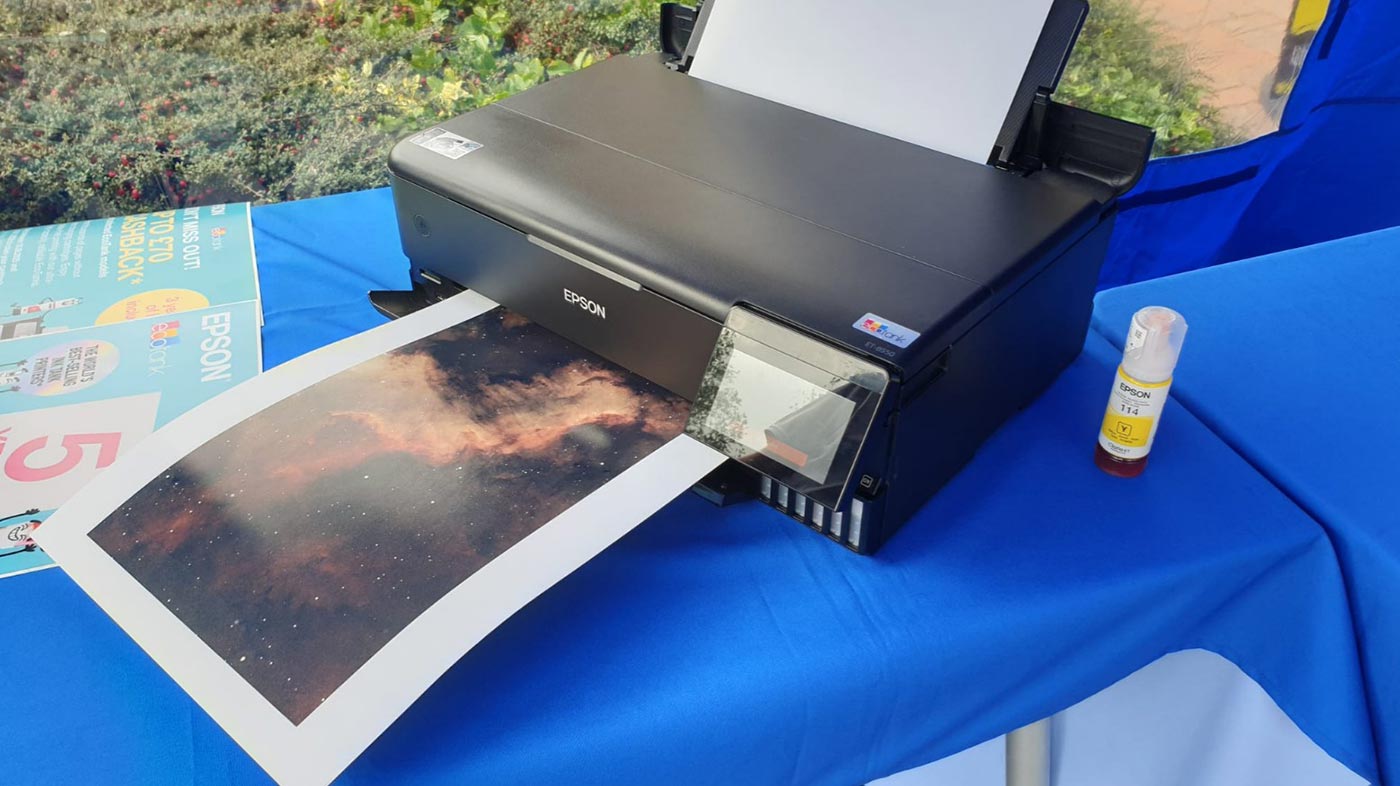
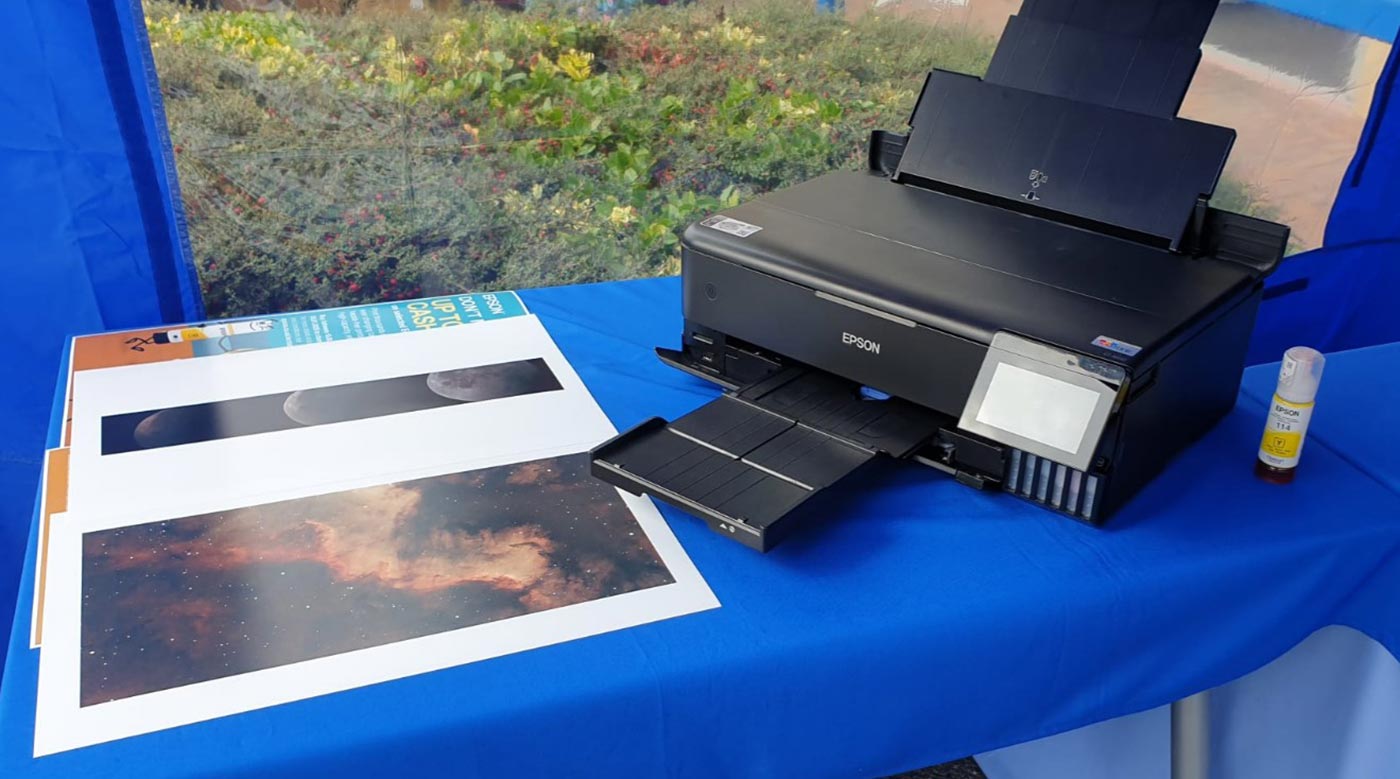
On Saturday, 20th September 2025, Park Cameras held their popular Wildlife Day event at their Burgess Hill store, where a representative from Epson UK was on-hand throughout the day showcasing what their range of inkjet printers can offer customers. I must admit that I’ve never considered printing any of my astro pictures, and despite them not being wildlife based I took a trip to the store with the files on a USB drive to see what they can do.
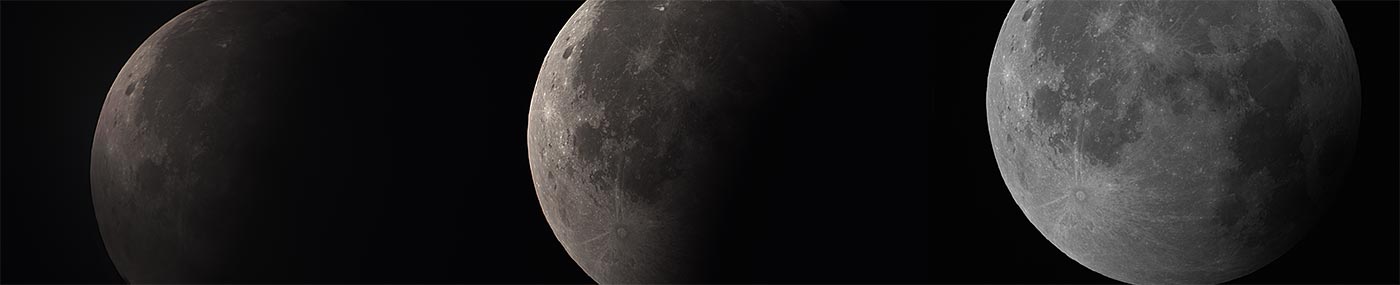
I process all my images on my laptop and they stay as an endless growing folder of desktop background images, so I was quite intrigued to see what this may look like once printed. I selected a couple of images to be printed: the first, the Cygnus Wall which I photographed and shared in last months blog (https://www.parkcameras.com/blog/tips-and-inspiration/september-astrophotography-highlights-uk-and-ni_a-09) I felt it has a lot of dynamic range, with delicate details, contrast and intrigue that all add to the visual experience. The second, the Lunar Eclipse Composition, whilst it looks like it is monochrome, it is actually colour, the Moon has a very subtle pink/red colour in the first transition, a more blue one in the second and almost a faint yellow tint in the third. All images were printed on Epson Premium Lustre Photo Paper (A3+ and A2) using an Epson ET-8550 EcoTank All-In-One A3+ Photo Printer.
I stood watching the image being printed, having no idea what to expect, but as soon as I saw the first pass of the printer head, I knew it was far more than I could imagine. It accurately replicated my image and even stacking artefacts which I hadn’t noticed before were now clear to see (on the left of the Cygnus Wall image you can see an inch or so where the stack of images haven’t all captured the exactly the same part of the sky). The faint details, such as the whisps of nebula, and the folds of cloud in the part I think looks like a lady driving a moped through a washing line are astonishing. Next it was the turn of the Lunar composition, again the blacks were very black, but the faint hue of colour that was so subtle on the screen, was captured elegantly across the vista. I am truly impressed!
The EcoTank ET-8550 is a fantastic printer that not only allows you to produce high-quality, long-lasting photos up to A3+ size, it also saves you time and money as it uses refillable ink bottles saving you having to buy replacement ink cartridges all the time, and it’s super easy to refill when the time comes too!
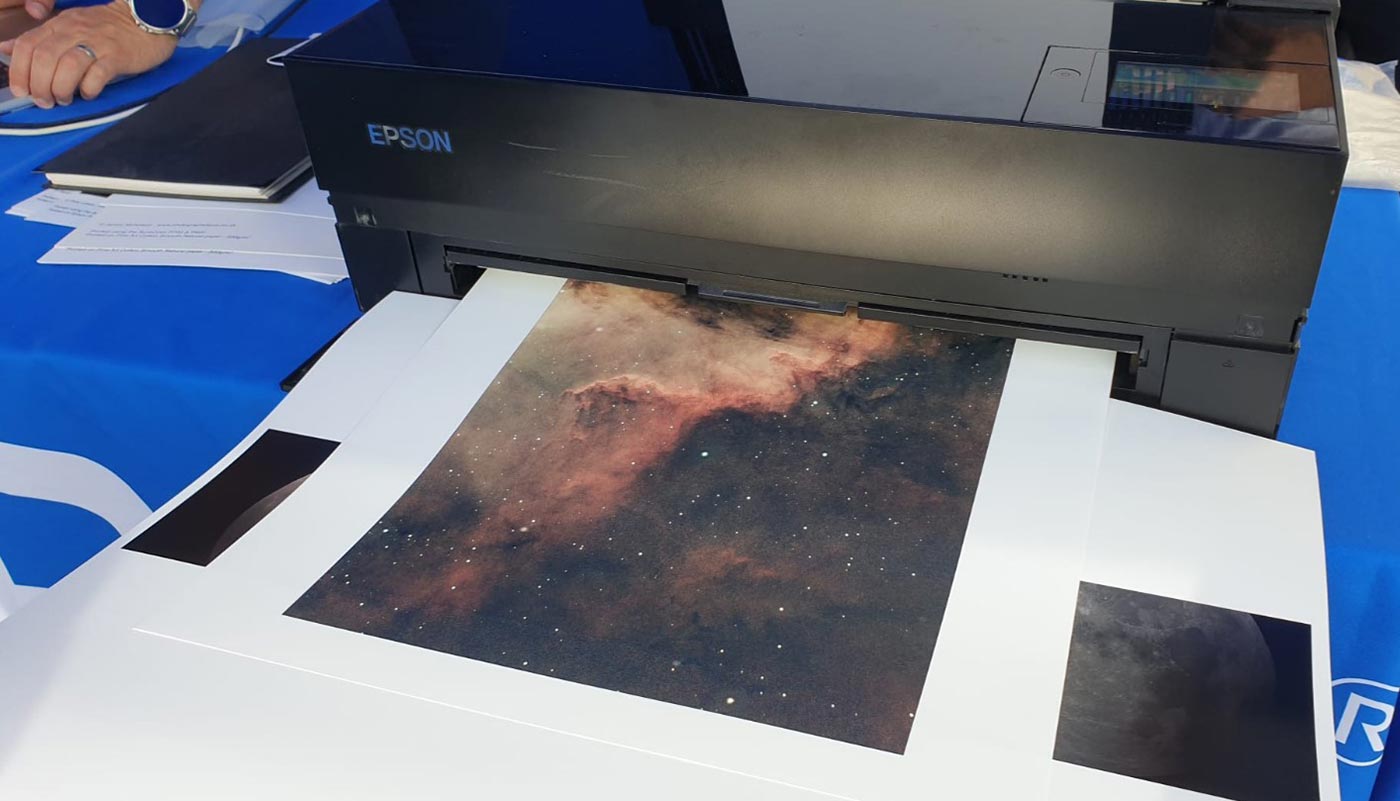
Epson SureColor SC-P900 A2+ Printer.
Next was the turn of the SureColor SC-P900; a printer capable of printing up to A2 offering pro quality prints with increased black density. Quietly it burst into life and started printing the Lunar composite, the dynamic range of the craters, the subtle transition of the Earths shadow over the moons surface, to the sunlight reflecting off the craters is captured in my opinion in far greater detail than what I can see on my computer monitor! Then the turn of the Cygnus Wall came, with 10 colours in its arsenal, the SC-P900 delivered exceptional depth and accuracy in such vivid detail, I really am astonished as to how good it is, I really didn’t know that printers could be this good!
Planetary
Its lovely to welcome our dear friend Bob Marshall back to the blog this month! He has been out capturing some marvels for us all to enjoy, he writes:
It's my first return to the ringed planet this year and I'm hoping that I'll be able to follow Saturn throughout it's entire apparition, when the Earth virtually goes through the ring plane! Sadly, there's no shadow transits of Titan, Saturn's largest satellite!
I was out for about an hour or so, by which time Saturn was of a good altitude. Sadly though, in that time, the astronomical seeing had deteriorated, with hardly a moment of calm.
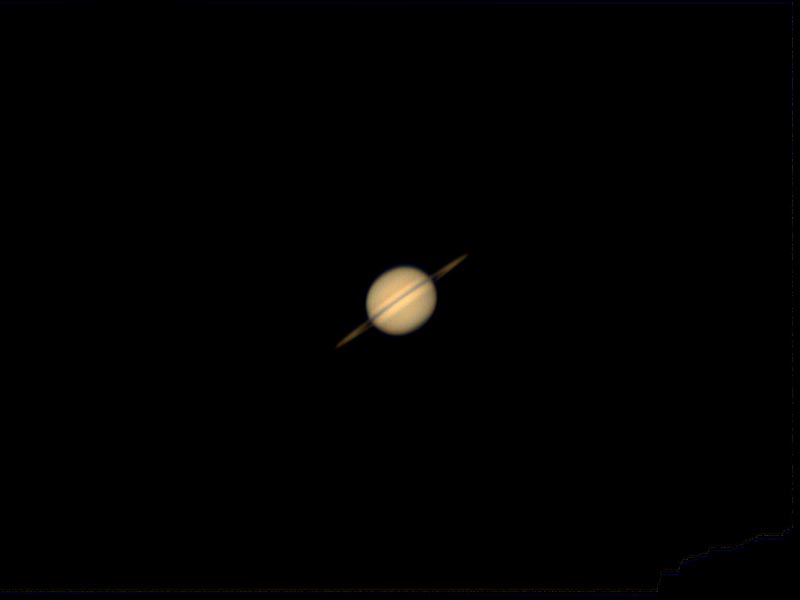
All images utilised my Celestron EVO C8 HD, and my ASI 178mc colour camera (call for pricing 01444 237070). Captures were made using SharpCap 4, ranging between 2 min and 3 min SER videos, between 10ms and 30ms exposures, and frame rates from 33fps to 100fps. Images were stacked and processed with ASI Studio, which is the only processing software I can get my head around!!!!
The dwarf planet Pluto taken on 23rd August. Currently at opposition, and it's magnitude is around 15!! All images were captured via the S50 Seestar (https://www.parkcameras.com/shop/zwo-seestar-s50-all-in-one-smart-telescope_9800933w). The Seestar will always put the located object in the centre of the frame, so over the course of the 13 days that these images cover, the first and the last star fields are of a different scale, making identification awkward.

Lunar
The Lunar Eclipse 7th Sept. Unfortunately for those of us sat on Worthing Beach awaiting the eclipsed moon to break the horizon, our view out over the channel of this celestial event was marred by a very large amount of cloud.
Eventually the cloud dissipated and we were able to see this about 30 mins after totality. I took a 1 minute video every 30 minutes which gave me around 2,800 frames per image. I then processed the video in PIPP, and then in AutoStakkert, combining the 3 in PhotoShop. I am impressed with how sharp the outcome is, and the principles of lucky imaging I am sure you'll agreed show in the final image! The 3 images show the shadow of the Earth pass across the Moon 30 minutes apart.
Deep Sky Objects
Bubble Nebula
The Bubble Nebula is one of those cosmic sights that really make me wonder — a glowing sphere of gas suspended in the depths of space. Officially known as NGC 7635, it sits about 7,000 light‑years away in the constellation Cassiopeia.
Its distinctive bubble shape is sculpted by the fierce stellar winds of a massive, hot, young star at its centre — BD+60 2522. This star is dozens of times more massive than our Sun and blasts out streams of charged particles at thousands of miles per second. Those winds slam into the surrounding interstellar gas, pushing it outward and creating a shock front. Over tens of thousands of years, that shock front has inflated the spherical shell we see today.
The nebula itself is an HII region, meaning it’s filled with hydrogen gas ionised by the star’s intense ultraviolet radiation. That ionisation makes the gas glow in rich colours — reds from hydrogen, greens/blues from oxygen, and other subtle hues from trace elements like nitrogen and sulphur. The bubble is about 7 light‑years across and still expanding at roughly 36 km/s.
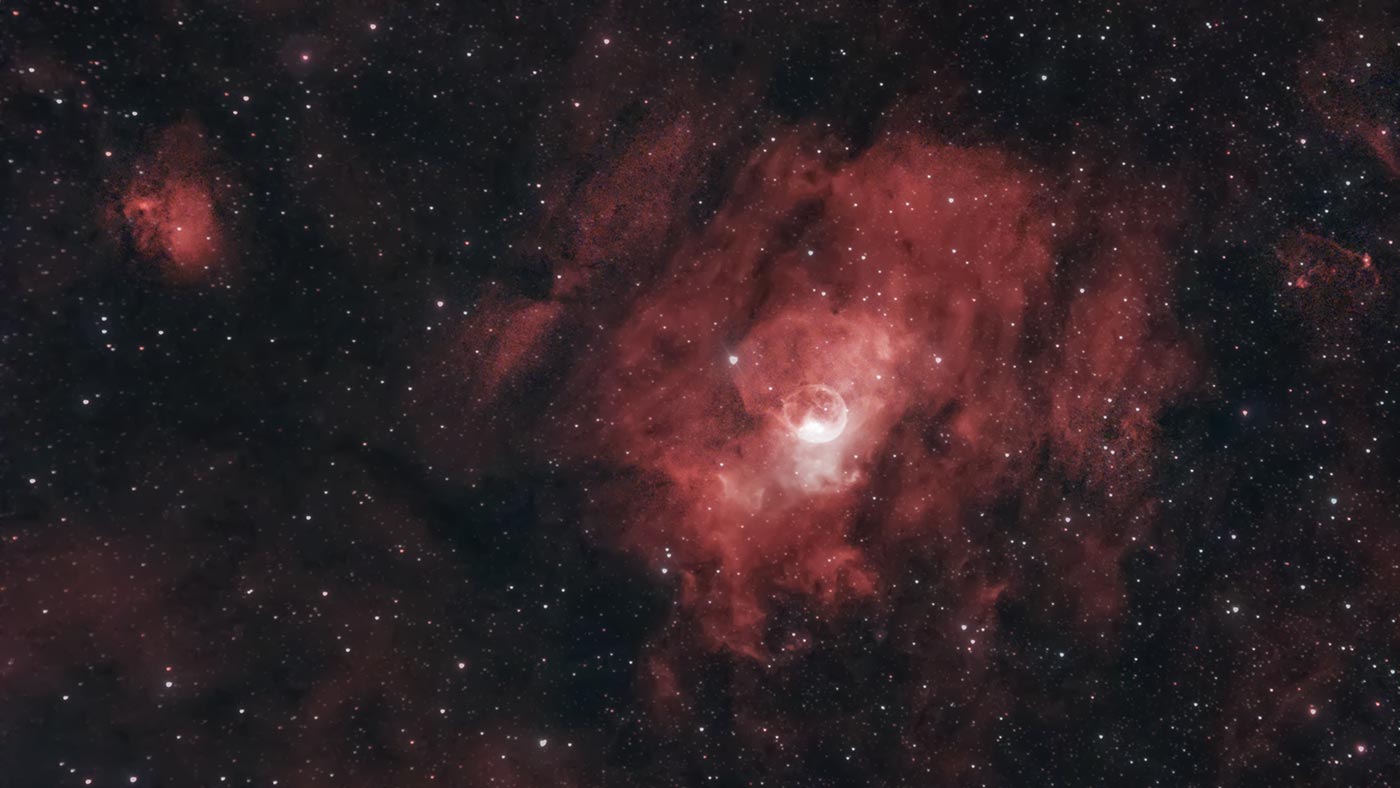
EXIF
Camera: ZWO ASI585MC Pro.
Telescope: Altair Astro 70ED Telescope (420mm) + 0.8 reducer.
Mount: Sky-Watcher EQ5 Pro StellaTuned.
Filter: Optolong L eNHance
Guide Camera: ZWO ASI120mm-s
Guide Scope: SVBony 30mm (f4)
Computer: ZWO ASIAIR pro
Method:
Lights: 60 x 120s Gain 252 (Unity).
Darks: 0
Flats: 0
Bias: 0
Stacked in Deep Sky Stacker, Siril for Photometric Colour Calibration and StarNet++ for star removal. Stretched, recompiled and edited in PhotoShop
Crescent Nebula
The Crescent Nebula is a striking shell of glowing gas in the constellation Cygnus, about 4,700–5,000 light‑years from Earth. Its delicate, curved filaments give it the appearance of a cosmic crescent, but in reality it’s a three‑dimensional bubble of material shaped by the life cycle of a single, extraordinary star.
At its heart lies WR 136, a type of massive star known as a Wolf‑Rayet. These stars are in a late, unstable phase of their evolution, blasting out intense stellar winds at millions of kilometres per hour. In the case of WR 136, those fast winds are colliding with slower gas it shed long ago when it swelled into a red giant. The collision creates shock waves — one moving outward into space, the other back toward the star — that heat the gas to extreme temperatures and make it glow in visible light, ultraviolet, and even X‑rays.
The nebula spans roughly 25 light‑years across and is rich in ionised hydrogen and oxygen, which produce its characteristic red and blue hues in astrophotography. Through a telescope, especially with an O III or UHC filter, or in my case an L eNhance, observers can trace its arc‑shaped filaments against the dense star fields of Cygnus. It sits near the bright star Sadr (Gamma Cygni), in a region crowded with other nebulae.
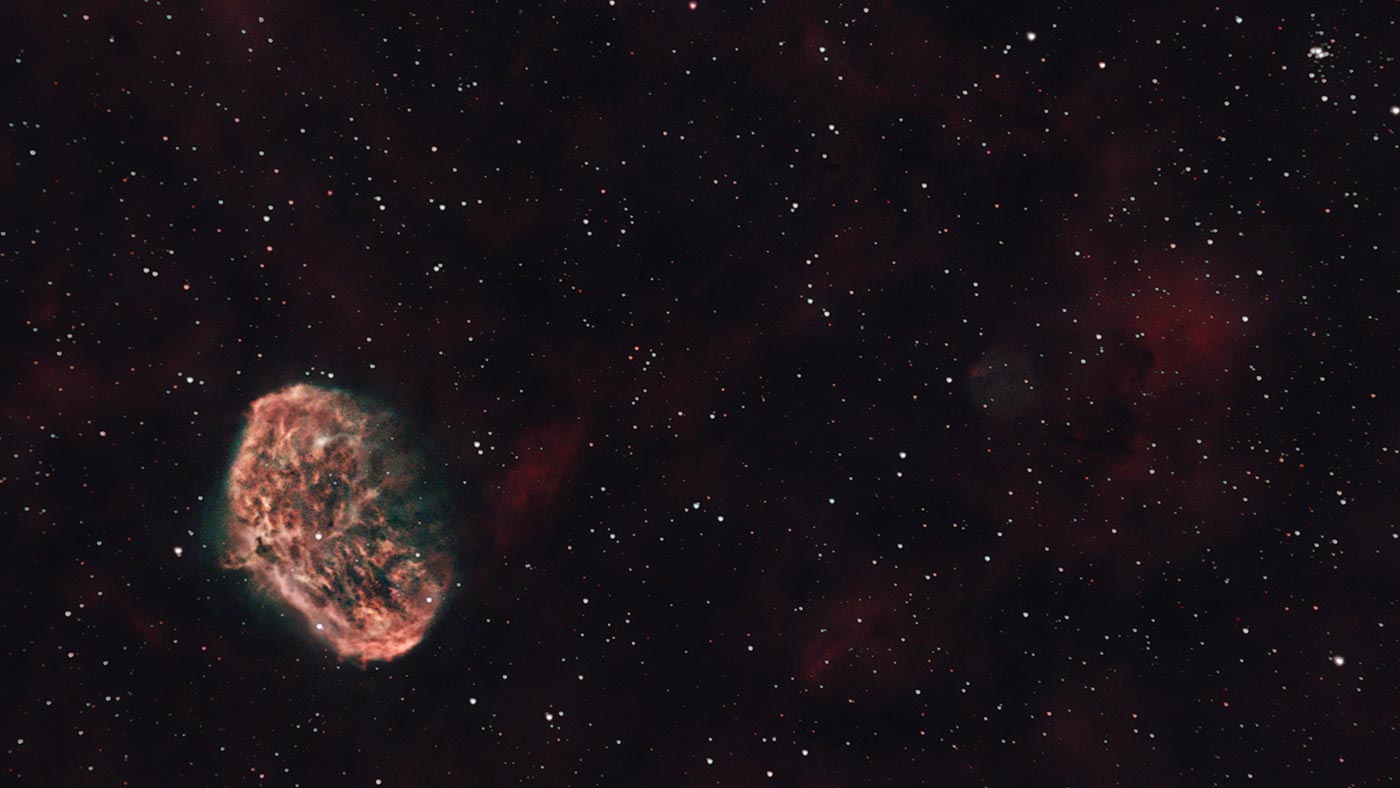
EXIF
Camera: ZWO ASI585MC Pro.
Telescope: Altair Astro 70ED Telescope (420mm) + 0.8 reducer.
Mount: Sky-Watcher EQ5 Pro StellaTuned.
Filter: Optolong L eNHance
Guide Camera: ZWO ASI120mm-s
Guide Scope: SVBony 30mm (f4)
Computer: ZWO ASIAIR pro
Method:
Lights: 120 x 120s Gain 252 (Unity).
Darks: 0
Flats: 0
Bias: 0
Stacked in Deep Sky Stacker, Siril for Photometric Colour Calibration and StarNet++ for star removal. Stretched, recompiled and edited in Photoshop
Wizard Nebula
The Wizard Nebula is a sprawling, sculpted cloud of gas and dust in the constellation Cepheus, wrapped around a young open star cluster known as NGC 7380. It earned its nickname because, in deep astrophotography, the glowing filaments and dark lanes trace shapes that resemble a robed figure — almost like a wizard conjuring light in space - I'll let you be the judge of that!
This region lies roughly 7,000–8,000 light‑years away in the Milky Way’s Perseus Arm. At its centre is a pair of massive, hot O‑type stars locked in a tight orbit. These stars pour out intense ultraviolet radiation and powerful stellar winds, which carve cavities in the surrounding material and make the hydrogen gas shine with a reddish glow. The winds also compress nearby clouds, triggering new bursts of star formation along the nebula’s edges.
The Wizard Nebula spans about 20 light‑years and is a classic HII region — a place where young, energetic stars are actively shaping their environment.
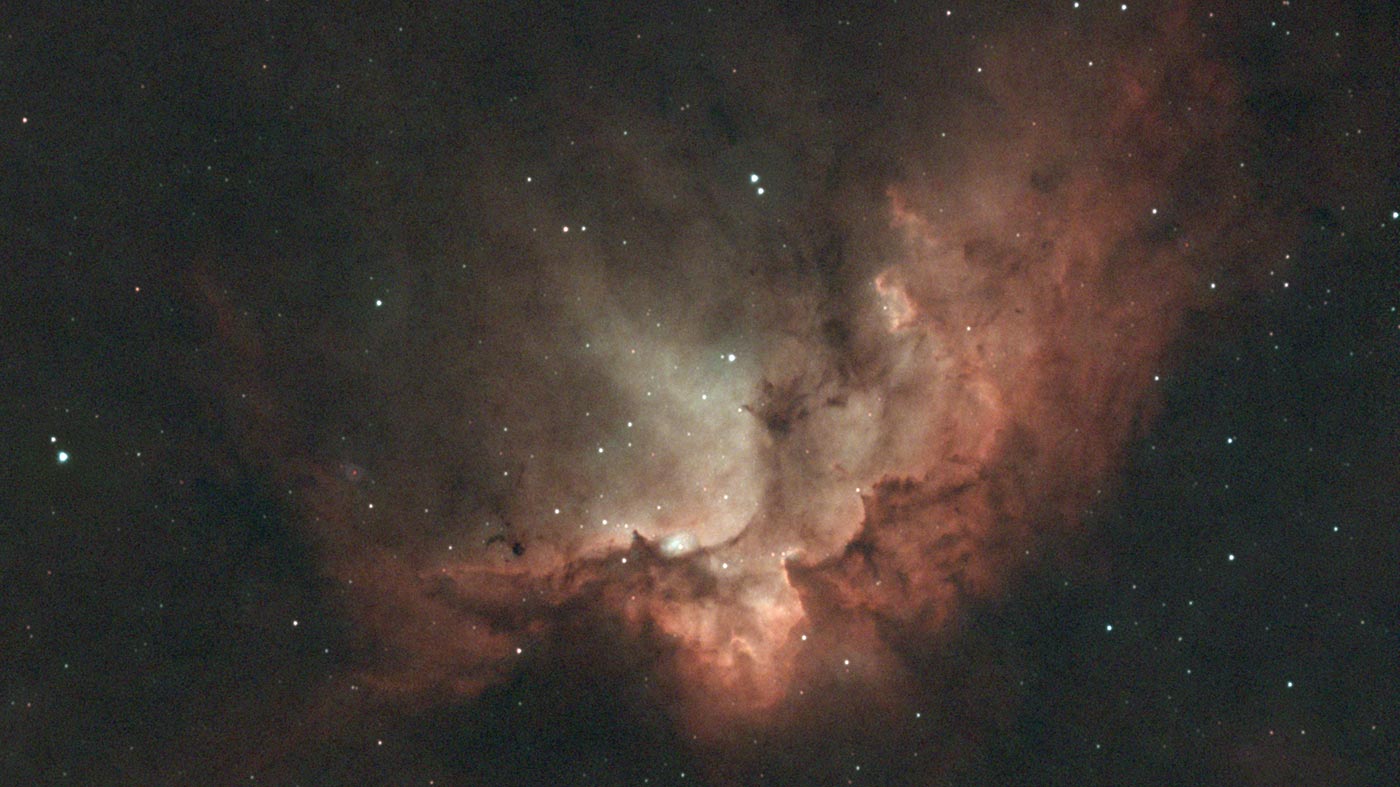
EXIF
Camera: ZWO ASI585MC Pro.
Telescope: Altair Astro 70ED Telescope (420mm) + 0.8 reducer.
Mount: Sky-Watcher EQ5 Pro StellaTuned.
Filter: Optolong L eNHance
Guide Camera: ZWO ASI120mm-s
Guide Scope: SVBony 30mm (f4)
Computer: ZWO ASIAIR pro
Method:
Lights: 60 x 120s Gain 252 (Unity).
Darks: 0
Flats: 0
Bias: 0
Stacked in Deep Sky Stacker, Siril for Photometric Colour Calibration and StarNet++ for star removal. Stretched, recompiled and edited in Photoshop
Share this post:
By Jonathan Penberthy on 01/10/2025
Jonathan Penberthy
Cosmic Shutter Seeker and Star Programmer
Jonathan Penberthy is the Cosmic Shutter Seeker and Star Programmer at Park Cameras, with over 20 years of experience as a software engineer. His career journey has spanned industries, but a move to Park Cameras sparked a passion for astrophotography. Jonathan’s interest began while working on a lens selection app, leading him to explore the night sky with a Canon 7D. When he’s not programming or photographing the stars, he enjoys sailing and navigating by the cosmos. Learn more on his profile page.

Trade in your old equipment
Fast and easy trade in service ensures your old gear is collected efficiently and you are paid quickly! It's very simple to trade in your unwanted photography gear. Just head over to our dedicated Sell or Part Exchange page, fill out the details, and we'll get back to you with an offer for your old gear. Take the cash, or put it towards the cost of your new gear. It's up to you! Find out more
sign up to the newsletter
Keep up to date on the latest photography news, events and offers. Sign up now