- Call us 01444 237070

-
- Back
- Used Cameras
- Used Accessories
- Used Lenses
- Back
- Used Canon Lenses
- Used Nikon Lenses
- Used Fujifilm Lenses
- Used Sony Lenses
- Used Micro 4/3rds Lenses
- Used Leica Lenses
- Used Panasonic Lenses
- Used Pentax Lenses
- Used Samyang Lenses
- Used Sigma Lenses
- Used Tamron Lenses
- Used Tokina Lenses
- Used Voigtlander Lenses
- Used Zeiss Lenses
- Used Hasselblad Lenses
- Used Video
- Used Film Equipment
- Used Stock Alert
- Used Blank Test
- Sell or Part Exchange
- Used Clearance
- Recently Added Used Equipment
- Park Picks
- Faulty
- Trade-In
- Blog
- New in
- Call us
- Contact us
- Stores
- Sign in
- Categories
- Tips & Inspiration
- Reviews
- News
- Events
- Features
- Buying Guides
- Competitions
Beginners Guide to Deep Sky Imaging Level 2
This is the second tutorial in the series 'beginners guide to deep sky imaging' please read Level 1 first as we will build on the concepts in this.
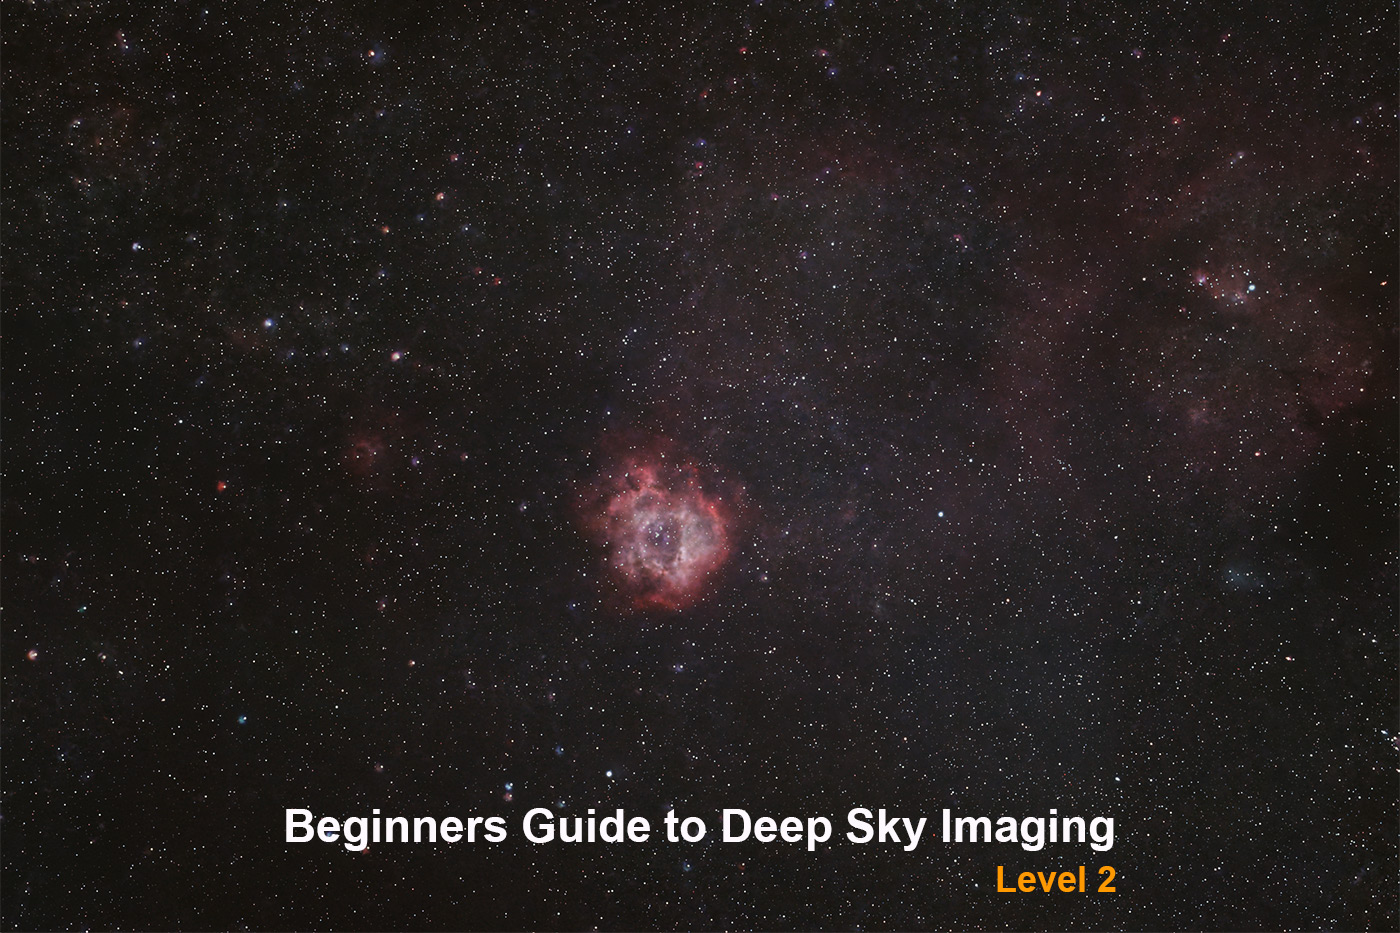
This process is mainly how to capture nebulae and the Milkyway galaxy, can also be adapted for other galaxies too, and a basic ability to capture planets and the moon.
The absolute minimum kit you need is a DSLR or Mirrorless camera, fairly fast lens, intervalometer for your camera (may have one built in), sturdy tripod, a star tracker (like Sky-Watcher SA2i (please call for pricing) or even the Sky-Watcher Star Adventurer GTi Mount Head, computer (Windows), Photoshop and a dark clear night sky!
If you don’t have all of these bits already, and are just starting out I would strongly recommend buying a Smart Telescope instead like these, they are fantastic for beginners and will get you far better results without such a steep learning curve:
- DWARF Mini Smart Telescope
- DWARF 3 Smart Telescope
- ZWO Seestar S30 All-In-One Smart Telescope
- ZWO Seestar Smart Telescope S30 Pro
- ZWO Seestar S50 All-In-One Smart Telescope
However, if like me you have a passion to learn new things, and want to understand the hard way at every level, then this guide is for you!
Honestly though if I could go back in time to when I was thinking of buying a star tracker, I would have skipped this level all together and gone straight to Level 3! Hindsight is a wonderful thing, and if you decide to go down the Sky-Watcher Star Adventurer GTi Mount this will see you into Level 3, however sadly with the Sky-Watcher SA2i you will struggle to get better results.
So in this guide we will use:
- Used Canon 7D
- Used Sigma 70-200mm f/2.8 EX APO DG HSM Lens
- Manfrotto 290 Tripod
- Sky-Watcher Star Adventurer SA2i (Call for pricing 01444 237070)
- Laptop - Windows 10, 8GB RAM i5 processor.
- Cheap intervalometer.
- Batinov Mask - not essential (Call for pricing 01444 237070)
- A good quality Spirit Level.
The minimum skills you need are determination and patience. A lot of patience!
I live in a Bortle 4/5 location so light pollution is a real factor, you can find your Bortle here and of course don't hesitate to go to somewhere a bit darker!
Focusing as in Level 1:
It is very difficult to focus a camera in the dark. So here are my tips, they are not perfect, but have served me well.
- During the day, focus on a far away object, as far away as you can for your lens, essentially infinity focus - don't trust your lens markings, we need the sharpest focus we can get. Then get some tape and tape the lens in that position, or if you don't wish to risk damaging your lens then make a note where the position is, for example take a photo on your phone of the position.
- If it is already dark, look through the view finder, or magnify your live view to the max on the back screen of your camera and rotate the focus ring to make the stars as small as possible. I have found with some lenses, it is impossible to achieve infinity focus, but you can get close enough that if you don't pixel peep, it doesn't look too bad!
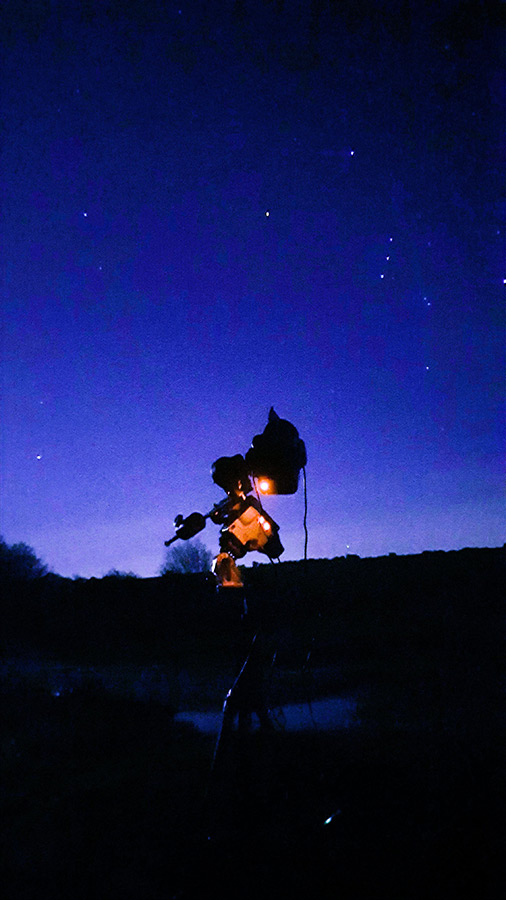
Setting up the star tracker:
This will be the most time consuming part of your journey. I have in the past spent so long doing this (hours) that by the time I have got it right, the others I was out with have finished their imaging runs and are packing up to go home. This and this alone is the reason why I recommend you skip to Level 3 or buy a Smart Telescope if you can. But if you are stubborn like and, and want to understand the theory then keep reading - patience translates to results!
Tripod perfectly level - pointing North:
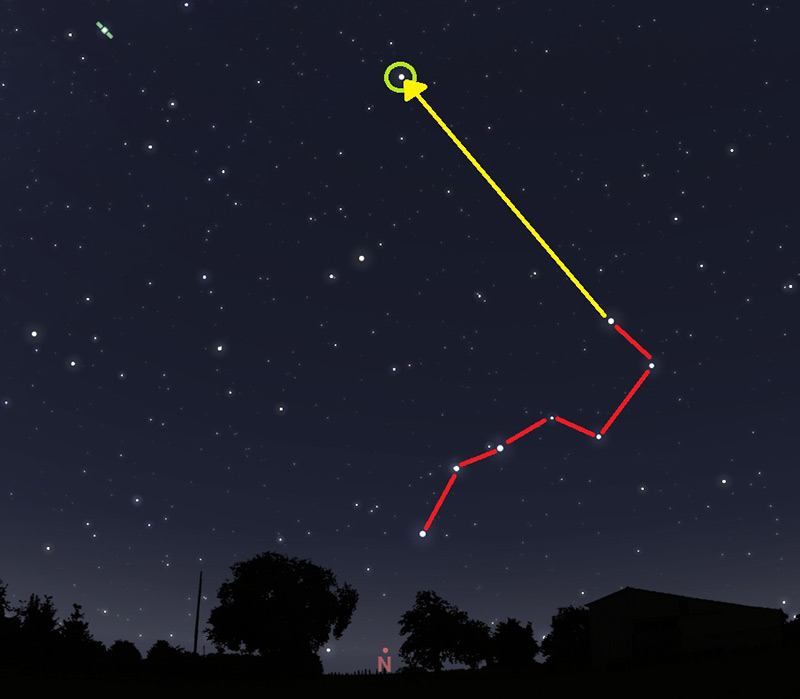
Credit Stellarium with some influence from me in paint!
You can use a compass for a rough north heading, but remember magnetic north is different from polar north, and as this is Level 2, not 3 we cant get a helping hand from our kit, so we need to do it the hard way. Locate the Plough asterism in the night sky (Big Dipper, Large Saucepan, or if you are really into your constellations it is part of Ursa Major the Great Bear). You should be able to see it even in the most light polluted skies. Then follow a line from the last two stars in the asterism (shown in yellow) until you get to the next brightest star circled in green, this is the Pole Star (Polaris), and we are lucky we have it in the northern hemisphere, whilst it isn’t perfectly north, it is better than nothing which is what those in the southern hemisphere have. We wont have this forever, but at least the next 10,000 years so we shall pretend this is constant!
Next, level your tripod with the spirit level, it must be perfect, and I wouldn't recommend using the little dot thing which comes on many tripods nor the level in budget cameras / Smart Phones, they are very good for taking normal photos, but for this you need accuracy, the more accurate the better the image, and don't get me wrong with this kit you really need it, it isn't forgiving! So take your time.
Polar Alignment:
Attach your wedge to your tripod and mount(SA2i) to the wedge, look through the polar scope, remove the caps if required, you should see Polaris. Please don't panic if you don’t, this is very hard, and so you need to use the wedge to adjustment the Azimuth "AZ" (left/right) - Altitude "Alt" (up/down) so that you can see the polestar, always loosen one (i.e. left) and tighten the other (i.e. right).
Don't be disheartened if you find it hard, it is. To start with I would recommend setting your Alt roughly, you can use the scale on the side of you wedge and the geographic latitude from GPS, so in my case it will be 51° North, but check for your location. Then set your wedge Alt (up/down) to this.
Earlier I hinted that Polaris is north but not perfect, now we need to get it perfect. Failing to get a good polar alignment will lead to issues with your images. Fortunately Sky-Watcher have created an app to help us with this called "SA Console" you can use it to control your imaging session, but as this is very specific to the SA2i and not general like this guide so I shall not go into it. Just the free to use useful feature in the app, go to the option 'Polar Clock Utility' you will see this:
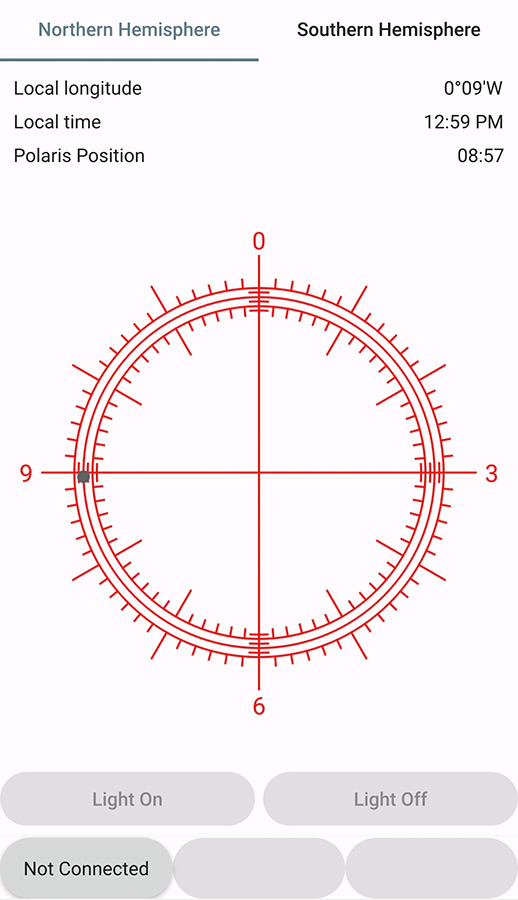
Look into your polar scope, you will see the clock on the reticle (you may need to use the built in illuminator or a source of faint light to see it) BE VERY CAREFUL shining a torch down a telescope whilst looking through it is never a good idea! Once you can see the clock in the polar scope and Polaris at the same time, use the Alt/Az controls we talked about earlier so that Polaris appears in the position the black dot does in the app. This is tough, and will take a while to get right, mastering it is not easy, but sadly essential. Once you have got polar alignment, then your tripod needs to be guarded from knocks and vibration, anything and your polar alignment will be out, so be very careful.
Adding your camera and lens:
We need to make sure that your camera and lens, plus all the cables you need (like intervalometer and battery etc) are balanced. In the case of the SA2i we only need to worry about Right Ascension "RA", in Level 3 we will talk about Declination "Dec". This is because these simple star trackers only counter the rotation of the earth and not the Declination.
Obviously you have just spent hours getting your mount polar aligned, the last thing you want is to accidentally knock it, as such I would recommend doing this next:
Attach your camera using a suitable tripod plate that your mount bracket (in the case of the SA2i its green and L shaped) attach the counter weight if required, , then using a pencil or a larger pivot object) on a desk rest the plate with camera, lens and cables attached so that you can work out where the centre of balance is.
Then when you have found it mark this centre point with something like tape so you can easily find it again.
Attach your rig (camera, lens and cables, bracket and counter weight etc.) to your mount tightening the clamp to hold it in place pointing towards Polaris.
Loosen the Dec clutch and check it is balanced, then retighten, and do the same with RA.
Theory - the rule of 500:
The Earth rotates at about 1,000 mph on its axis, in turn it revolves around the Sun at around 67,000 mph, and our whole solar system rotates around our galaxy (Milky way) at 514,000 mph. Feeling dizzy? You'll be glad to know that in this guide you don't need to worry about this so much, provided you have nailed the things about your mount will stay on the target you choose!
Finding the target:
I would recommend starting out with a very easy to find constellation, because this can be very difficult. Using a star guide tool like https://stellarium-web.org/ will help, but for this tutorial we are going to be assume you are familiar with the constellation Monoceros (Unicorn) which is visible in our Northern Hemisphere winter skies, if you are reading this at another time of year, then I would recommend trying Cygnus which also has many interesting deep sky objects to photograph.
We are going to try for the Rosette Nebula (NGC 2238)!
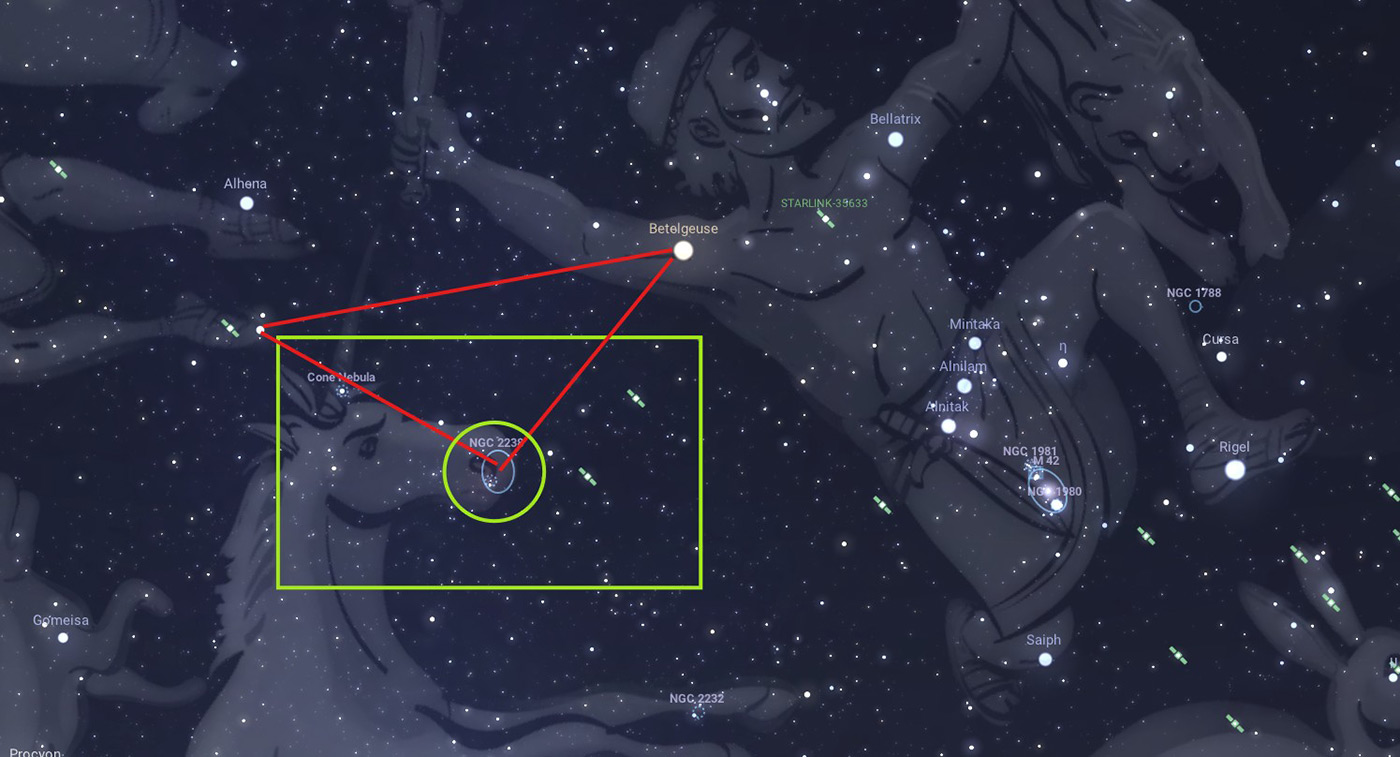
Credit Stellarium with some influence from me in paint!
The Rosette Nebula is located right in the mouth of the unicorn, which when you know where it is, is quite easy to find. Building on Level 1 in this series where we learned where Orion is, we can use Betelgeuse (bright red star on the shoulder of Orion) to triangulate NGC 2238, as you can see in the red right angle triangle I have drawn above. The green box gives you a rough idea of the field of view at 200mm using a crop sensor, and the green circle is the star cluster you want to centre as best you can in your frame.
How do I move my camera to that position?
Loosen the RA and Dec and gently, trying not to knock your mount out of polar alignment rotate them so that you can see the field of view on the screen of your camera... this is hard, it takes a lot of practice and many attempts, please don't get disheartened. Sometimes I would spend hours trying to find the target, and settle on another which just happened to be in frame.
Now we need to nail focus, for a quick attempt just make the stars as small as possible when zoomed to the max (x10 in the 7D) using the screen view on the back of your camera. If you have bought a Batinov Mask as suggested, then attach it to your lens, and set your intervalometer to take a 5 sec exposure (Bulb mode, ISO1600, RAW files only), and adjust focus until you see the bright stars have a perfect X with a line through the centre.
Don't forget to remove the Batinov Mask, I have done this many times!
So we are now:
✔ Polar aligned
✔ Balanced
✔ Focused
✔ On target
You are now ready to set your mount tracking, in the case of the SA2i turn the wheel on the side to the star symbol, this will track now as the normal sidereal rate.
So yell from the top of your voice "Imaging!":
Lights:
- Create a folder called '[YEAR-MONTH-DATE] [TARGET NAME] LIGHTS' in your camera and make sure these images are saved here (replace appropriate words with values).
- Set your intervalometer to a reasonable exposure length where the stars still look round, whilst we are tracking the stars, we are not guiding (Level 3). So we need to be mindful of this, so take a couple of test shots, say 30 secs to start with and alter as best suits. In the example here. I used 30 sec exposures.
- Check you are in focus.
- Start your plan running.
- Repeat this step as much as you can, moving your camera and checking focus as required, over multiple nights if you like!
Darks:
- Create a folder called '[YEAR-MONTH-DATE] [TARGET NAME] DARKS' in your camera and make sure these images are saved here (replace appropriate words with values).
- Put your lens cap back on and repeat the imaging plan you did for Lights. This will capture a set of images that show the dead pixels, amp glow and other noise caused by your camera, which has introduced photons to your sensor that you dont want in your image.
Create a folder called '[YEAR-MONTH-DATE] [TARGET NAME] FLATS' in your camera and make sure these images are saved here (replace appropriate words with values).
Let's not pretend that our sensors are 100% clean, nor that our lenses are completely free from dust, or in some cases fungus! Not to mention vignetting.
These issues can all be fixed with these Flat frames. So in order to do this, I point my camera on its tripod straight up. Put a white screen on my phone and wrap the phone in a thin white t-shirt/handkerchief to defuse the light, then take another 40 frames at about 1/40 sec, so that the histogram is 1/3rds to 1/2 way across the screen, or if you can't be bothered to find this setting on your camera, then you can see the dust etc. in the image and the image is a sort of off white/grey colour.
There are other calibration frames like Bias, Dark Flats etc. But as this is only Level 2 I won't go in to them!
Processing - no different to Level 1:
For your ease you can read it here.
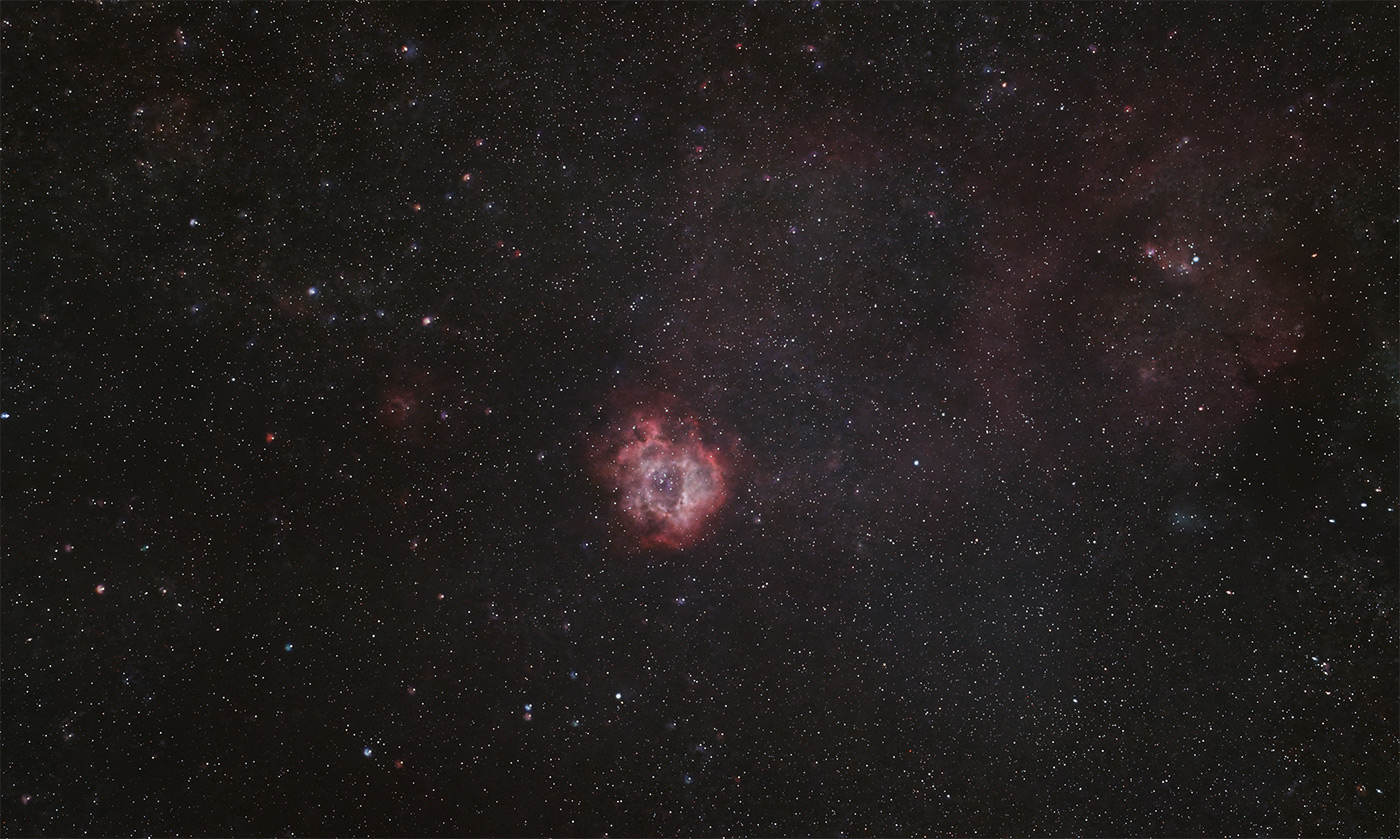
The finished article:
After cropping, image rotation and a bit of saturation adjustment and using the noise reduction sliders in Camera Raw Filter in Photoshop, this is the sort of image you can hope to achieve using the most basic of kit listed above. You can see Betelgeuse the large Red Dwarf star, the Horsehead and Flame Nebula, the Great Orion Nebula, Running Man Nebula and a faint but present Barnards Loop!
Exif:
- Used Canon 7D
- Used Canon 50mm F/1.8 STM Lens
- Manfrotto 290 Tripod
- Laptop - Windows 10, 8GB RAM i5 processor.
- Cheap intervalometer.
- Sky-Watcher Star Adventurer SA2i (Call for pricing 01444 237070)
- Batinov Mask - not essential (Call for pricing 01444 237070)
Lights:
120 x 30 sec subs @ISO1600
Darks:
40 x 30 sec subs @ISO1600
Flats:
40 x 1/40 sec subs @ISO1600
Processing: Followed the procedure above.
Share this post:
By Jonathan Penberthy on 28/01/2026
Jonathan Penberthy
Cosmic Shutter Seeker and Star Programmer
Jonathan Penberthy is the Cosmic Shutter Seeker and Star Programmer at Park Cameras, with over 20 years of experience as a software engineer. His career journey has spanned industries, but a move to Park Cameras sparked a passion for astrophotography. Jonathan’s interest began while working on a lens selection app, leading him to explore the night sky with a Canon 7D. When he’s not programming or photographing the stars, he enjoys sailing and navigating by the cosmos. Learn more on his profile page.

Trade in your old equipment
Fast and easy trade in service ensures your old gear is collected efficiently and you are paid quickly! It's very simple to trade in your unwanted photography gear. Just head over to our dedicated Sell or Part Exchange page, fill out the details, and we'll get back to you with an offer for your old gear. Take the cash, or put it towards the cost of your new gear. It's up to you! Find out more
sign up to the newsletter
Keep up to date on the latest photography news, events and offers. Sign up now