- Call us 01444 237070

-
- Back
- Used Cameras
- Used Accessories
- Used Lenses
- Back
- Used Canon Lenses
- Used Nikon Lenses
- Used Fujifilm Lenses
- Used Sony Lenses
- Used Micro 4/3rds Lenses
- Used Leica Lenses
- Used Panasonic Lenses
- Used Pentax Lenses
- Used Samyang Lenses
- Used Sigma Lenses
- Used Tamron Lenses
- Used Tokina Lenses
- Used Voigtlander Lenses
- Used Zeiss Lenses
- Used Hasselblad Lenses
- Used Video
- Used Film Equipment
- Used Stock Alert
- Used Blank Test
- Sell or Part Exchange
- Used Clearance
- Recently Added Used Equipment
- Park Picks
- Faulty
- Trade-In
- Blog
- New in
- Call us
- Contact us
- Stores
- Sign in
- Categories
- Tips & Inspiration
- Reviews
- News
- Events
- Features
- Buying Guides
- Competitions
UK Astrophotography Highlights October 2026
We are coming to that time of year where we are able to realistically get out straight from work, do a few hours imaging and be back home before midnight! Recently the Milky Way has been so clear to see, some nights I just sit there staring up at the sky in wonder, so please get out there and love the night!
This month I have enhanced the format of this blog a bit, to give News, Tutorial, Experimentation and of course a round-up of the Images captured over the last month. As always you will read about my success and failures, and hopefully it may give you a laugh along the way!
NEWS
| Monday | Tuesday | Wednesday | Thursday | Friday | Saturday | Sunday |
|---|---|---|---|---|---|---|
|
28 Sep
🌖 Waning Gibbous
☀️ Sun: 06:57 – 18:44
🌙 Moon: 19:33 – 10:48
🌌 Dark: 19:58 – 19:33
|
29 Sep
🌖 Waning Gibbous
☀️ Sun: 06:58 – 18:41
🌙 Moon: 20:00 – 11:48
🌌 Dark: 20:01 – 20:00
|
30 Sep
🌖 Waning Gibbous
☀️ Sun: 07:00 – 18:39
🌙 Moon: 20:34 – 12:44
🌌 Dark: 20:00 – 20:34
|
1 Oct
🌖 Waning Gibbous
☀️ Sun: 07:02 – 18:36
🌙 Moon: 21:18 – 12:44
🌌 Dark: 19:58 – 21:18
|
2 Oct
🌖 Waning Gibbous
☀️ Sun: 07:03 – 18:34
🌙 Moon: 22:12 – 13:48
🌌 Dark: 19:56 – 22:12
|
3 Oct
🌗 Last Quarter
☀️ Sun: 07:05 – 18:32
🌙 Moon: 23:14 – 14:41
🌌 Dark: 19:54 – 23:14
|
4 Oct
🌘 Waning Crescent
☀️ Sun: 07:07 – 18:29
🌙 Moon: --:-- – 15:24
🌌 Dark: 19:52 – 00:23
|
|
5 Oct
🌘 Waning Crescent
☀️ Sun: 07:08 – 18:27
🌙 Moon: 00:23 – 15:58
🌌 Dark: 19:50 – 01:36
|
6 Oct
🌘 Waning Crescent
☀️ Sun: 07:10 – 18:25
🌙 Moon: 01:36 – 16:25
🌌 Dark: 19:48 – 02:50
|
7 Oct
🌘 Waning Crescent
☀️ Sun: 07:12 – 18:23
🌙 Moon: 02:50 – 16:47
🌌 Dark: 19:46 – 04:04
|
8 Oct
🌘 Waning Crescent
☀️ Sun: 07:13 – 18:20
🌙 Moon: 04:04 – 17:06
🌌 Dark: 19:44 – 05:18
☄️ Draconids Peak 🧭 Look: NNW (Draco) ⏰ Best: Early Evening
|
9 Oct
🌘 Waning Crescent
☀️ Sun: 07:15 – 18:18
🌙 Moon: 05:18 – 17:23
🌌 Dark: 19:42 – 05:25
|
10 Oct
🌑 New Moon
☀️ Sun: 07:17 – 18:16
🌙 Moon: 06:31 – 17:39
🌌 Dark: 19:40 – 05:27
🌑 Prime Deep-Sky Window
|
11 Oct
🌒 Waxing Crescent
☀️ Sun: 07:18 – 18:14
🌙 Moon: 07:45 – 17:56
🌌 Dark: 19:38 – 05:29
|
|
12 Oct
🌒 Waxing Crescent
☀️ Sun: 07:20 – 18:11
🌙 Moon: 09:00 – 18:15
🌌 Dark: 20:04 – 05:30
|
13 Oct
🌒 Waxing Crescent
☀️ Sun: 07:22 – 18:09
🌙 Moon: 10:17 – 18:38
🌌 Dark: 20:38 – 05:32
|
14 Oct
🌒 Waxing Crescent
☀️ Sun: 07:24 – 18:07
🌙 Moon: 11:34 – 19:08
🌌 Dark: 21:20 – 05:34
|
15 Oct
🌒 Waxing Crescent
☀️ Sun: 07:25 – 18:05
🌙 Moon: 12:48 – 19:48
🌌 Dark: 22:12 – 05:35
|
16 Oct
🌒 Waxing Crescent
☀️ Sun: 07:27 – 18:03
🌙 Moon: 13:54 – 20:39
🌌 Dark: 23:13 – 05:37
|
17 Oct
🌓 First Quarter
☀️ Sun: 07:29 – 18:01
🌙 Moon: 14:49 – 21:40
🌌 Dark: 00:21 – 05:38
|
18 Oct
🌔 Waxing Gibbous
☀️ Sun: 07:31 – 17:59
🌙 Moon: 15:32 – 22:49
🌌 Dark: 01:34 – 05:40
|
|
19 Oct
🌔 Waxing Gibbous
☀️ Sun: 07:32 – 17:56
🌙 Moon: 16:06 – --:--
🌌 Dark: 02:48 – 05:42
|
20 Oct
🌔 Waxing Gibbous
☀️ Sun: 07:34 – 17:54
🌙 Moon: 16:32 – 00:01
🌌 Dark: 04:02 – 05:43
|
21 Oct
🌔 Waxing Gibbous
☀️ Sun: 07:36 – 17:52
🌙 Moon: 16:54 – 01:14
🌌 Dark: 05:15 – 05:45
☄️ Orionids Peak 🧭 Look: SE (Orion) ⏰ Best: Pre-Dawn Hours
|
22 Oct
🌔 Waxing Gibbous
☀️ Sun: 07:38 – 17:50
🌙 Moon: 17:14 – 02:26
🚫 Moonlit (No Dark)
|
23 Oct
🌔 Waxing Gibbous
☀️ Sun: 07:40 – 17:48
🌙 Moon: 17:32 – 03:37
🚫 Moonlit (No Dark)
|
24 Oct
🌔 Waxing Gibbous
☀️ Sun: 07:41 – 17:46
🌙 Moon: 17:50 – 04:48
🚫 Moonlit (No Dark)
|
25 Oct
🌕 Hunter's Full Moon
☀️ Sun: 06:43 – 16:44
🌙 Moon: 17:09 – 04:59
🚫 Moonlit (No Dark)
🌕 Peak: Full Moon
⏰ Clocks Go Back 🧭 BST Ends: 02:00 -> 01:00 ⏰ GMT Times Resume
|
|
26 Oct
🌖 Waning Gibbous
☀️ Sun: 06:45 – 16:42
🌙 Moon: 17:31 – 06:10
🚫 Moonlit (No Dark)
|
27 Oct
🌖 Waning Gibbous
☀️ Sun: 06:47 – 16:40
🌙 Moon: 17:57 – 07:22
🚫 Moonlit (No Dark)
|
28 Oct
🌖 Waning Gibbous
☀️ Sun: 06:49 – 16:38
🌙 Moon: 18:29 – 08:34
🌌 Dark: 18:24 – 18:29
|
29 Oct
🌖 Waning Gibbous
☀️ Sun: 06:50 – 16:36
🌙 Moon: 19:09 – 09:46
🌌 Dark: 18:22 – 19:09
|
30 Oct
🌖 Waning Gibbous
☀️ Sun: 06:52 – 16:34
🌙 Moon: 19:58 – 10:55
🌌 Dark: 18:21 – 19:58
|
31 Oct
🌖 Waning Gibbous
☀️ Sun: 06:54 – 16:32
🌙 Moon: 20:56 – 11:58
🌌 Dark: 18:19 – 20:56
|
1 Nov
🌗 Last Quarter
☀️ Sun: 06:56 – 16:31
🌙 Moon: 22:00 – 12:54
🌌 Dark: 18:17 – 22:00
|
ZWO Astronomy Photographer of the Year Award 2026
This competition offers so much inspiration and motivation, setting the standard of which I aspire to attain. It is so lovely to see what other Astro nerds have been up to. Well worth taking a look if you haven't already!
S50 Pro and Dwarf Draco
September saw the launch of the ZWO S50 Pro, and what a wonderous bit of kit this is for the price!
Not only does it allow for effortless star tracking and stunning captures of the night sky out of the box, but it also is suitable for day time photography too! Check out the link to see some sample images!
The Dwarf Draco was also launched last month, with a massive 90mm aperture and f/3.8 optics with dual 50MP sensors this is without doubt the most ambitious smart scope yet! It comes in two variants, the standard edition with dual narrowband Ha and OIII filter and an OD5 ND filter for solar imaging. Or for a little bit more you can have a version with an SII and OIII filter, and the Solar filter becomes an external magnetic one.
An Astro buddy of mine Michael Glazier has managed to get his hands on some test data out of the a demo version of the Draco, and has very kindly said we can share it!
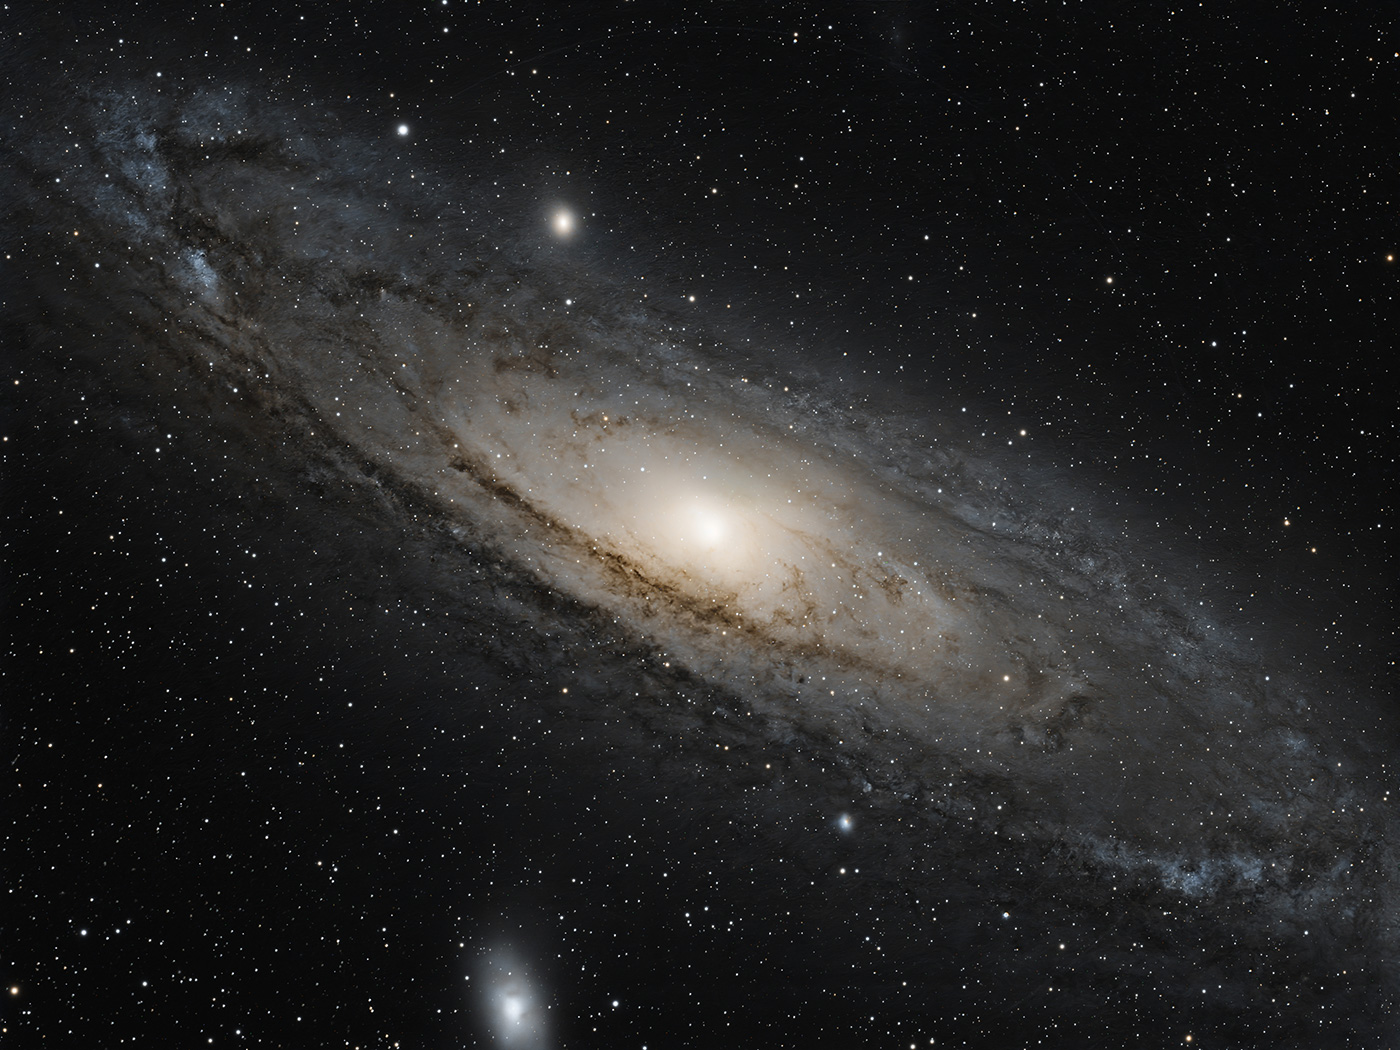
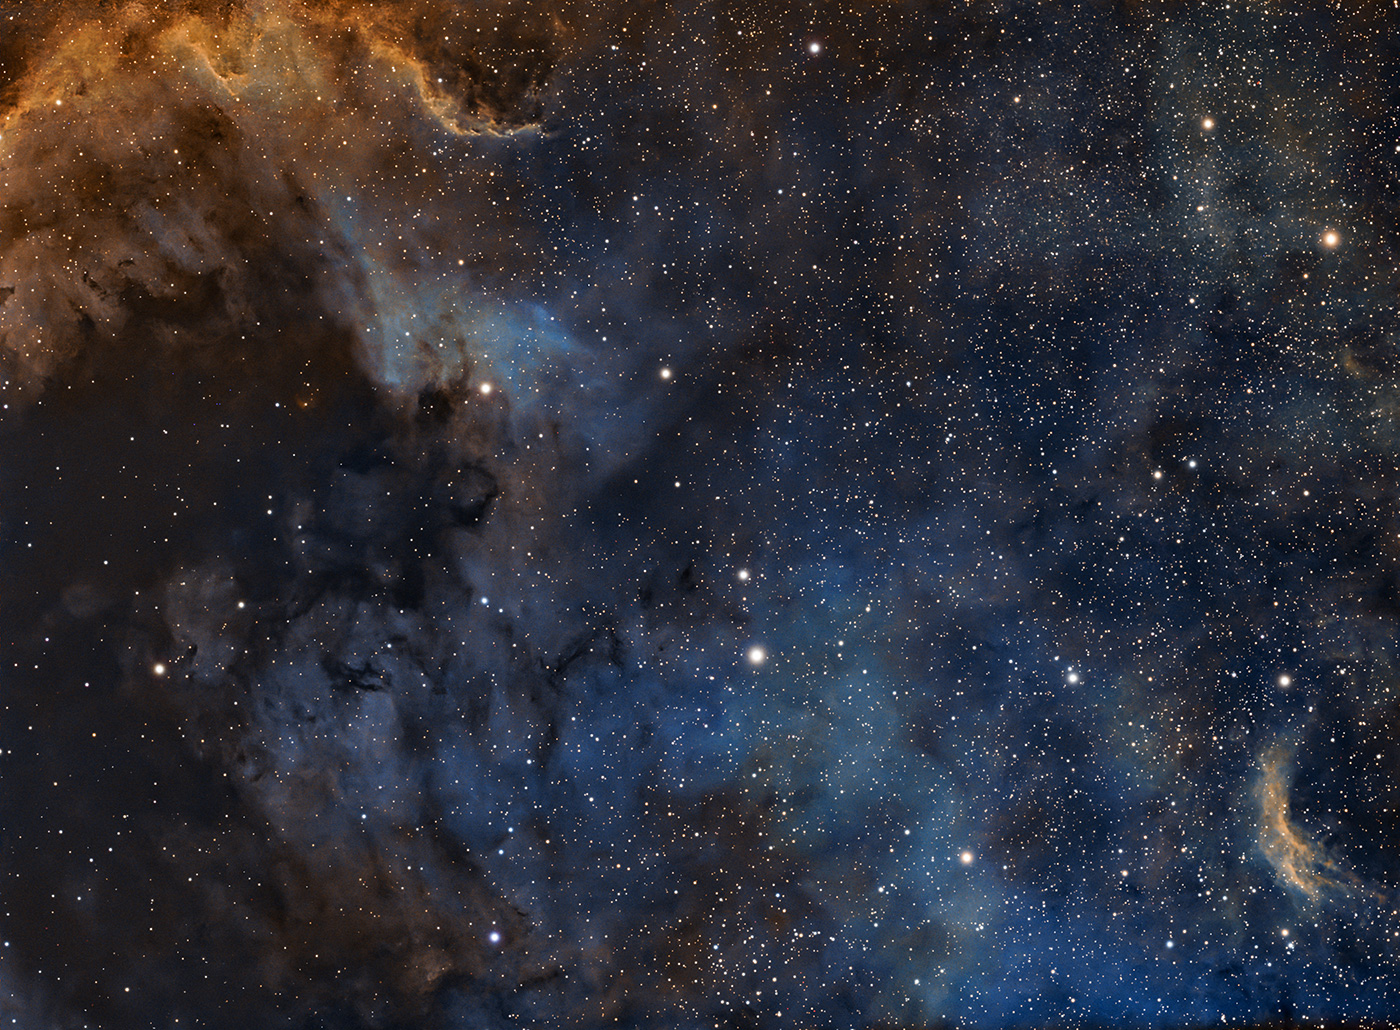
Both are remarkable products, and I am very much looking forward to seeing them in person!
New Supernova - Deer Lick Galaxy (NGC 7331) and yes, that is it's real name!
Please forgive the lack on an image just yet! The galaxy has a very bright new supernova in it called SN 2026aaiv. I shall be trying my best over the coming weeks to capture this rare event.
TUTORIAL - Mega Stack Combo (Data sharing)
Vince Cooper, a fellow Astro nerd, approached me with an idea, could we share our data, combine it and both reap the reward from more integration time?
Here is the challenge:
Vince has 19 hours of wondrous data he took with his ZWO ASI294MM mono camera in Ha, OIII and SII - Telescope 455mm focal length.
I have only 1.5hrs with my ZWO ASI585MC colour camera and 420mm focal length telescope with an Optolong L eNhance filter (Ha and OIII), but as a One Shot Colour image.
Different fields of view, different pixel sizes, one set mono, the other set colour, different telescopes... what could possibly go wrong?!
Method (will work in Siril but I used Pixinsight):
- Ran Background Extraction and BlurX on all of Vince's data.
- Ran the same over my data, and then split the channels.
- Combined my Green and Blue channels into one.
- Registered my Red (R) to Vince Cooper Ha, and Green and Blue channel (GB) to his OIII, then left his SII alone.
This meant the data was in the same orientation and same relative size.
When combining the registered with the wider data, I noticed that (as you will) it didn't quite go to plan , the balance was really off, you can see the combined stars but the sum of combining data resulted in a white area where my data had been added.
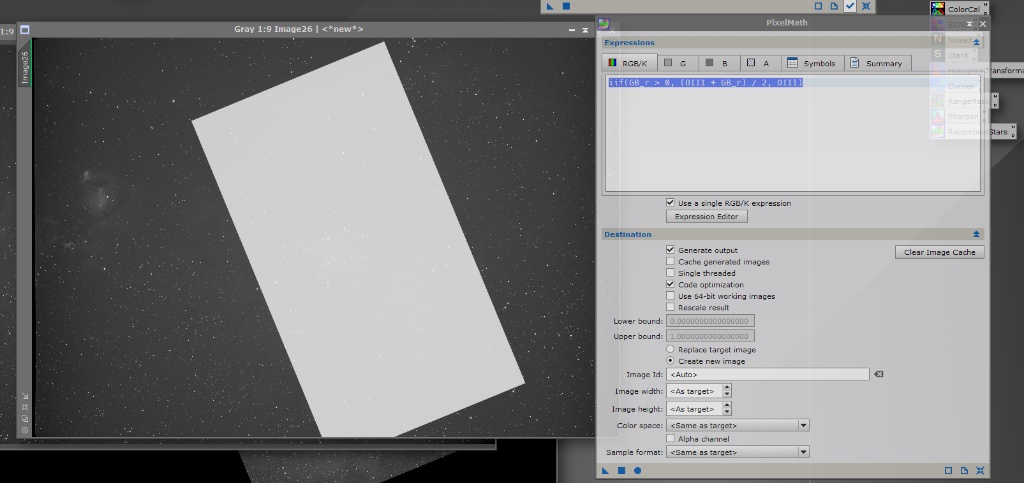
- So I analysed the statistics of each of the data sets, and noticed that my data was much brighter than Vince's, which is probably a result of the different cameras, f stops etc. As such I considered how to fix this.
My solution was a bit of PixelMath, which took a few iterations to get something right, but eventually I came up with this (uses variables and stat data relevant to images):
iif(GB_r > 0.033, (OIII + (GB_r - 0.05139 + 0.00762)) / 2, OIII)
In English this says if the smaller image is part of the larger image (above the 0.033 background border threshold), lower its brightness to match that of the larger image, add it to the larger image, and average them together. Otherwise, for the surrounding border, just keep the original larger image pixel.
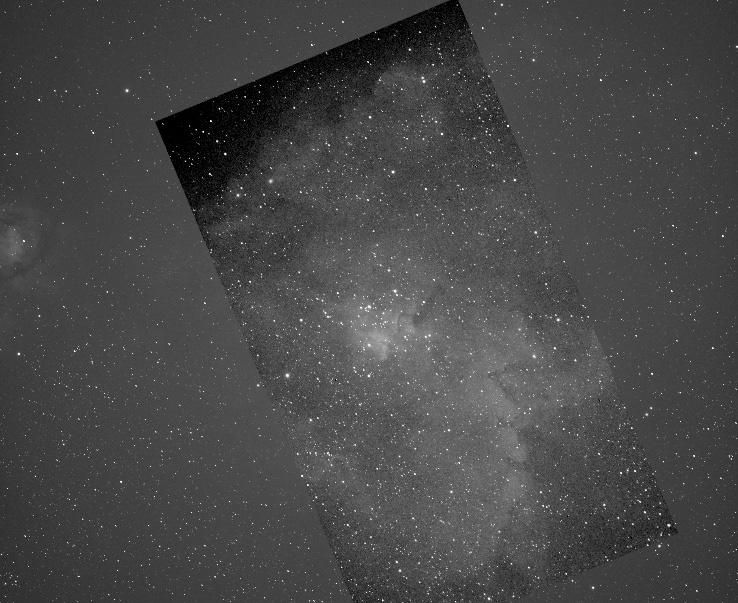
2. Once the process had been completed with the Ha and OIII images, I then combined them into SHO.
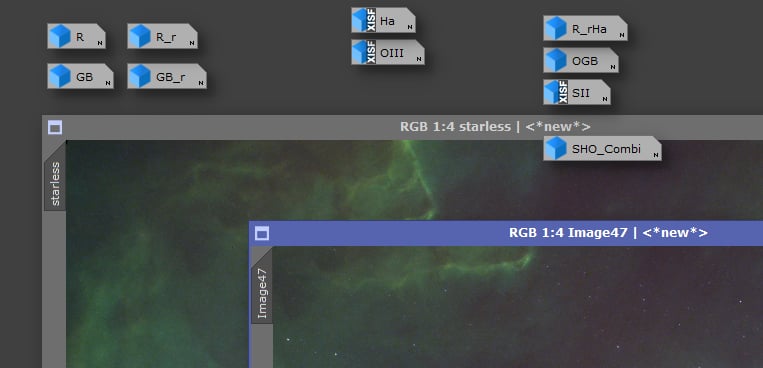
3. Ran NoiseX and StarX, masked, adjusted curves to suit on the Stars and Starless images.
4. Recombined Stars and Starless, cropped, and you have this image.
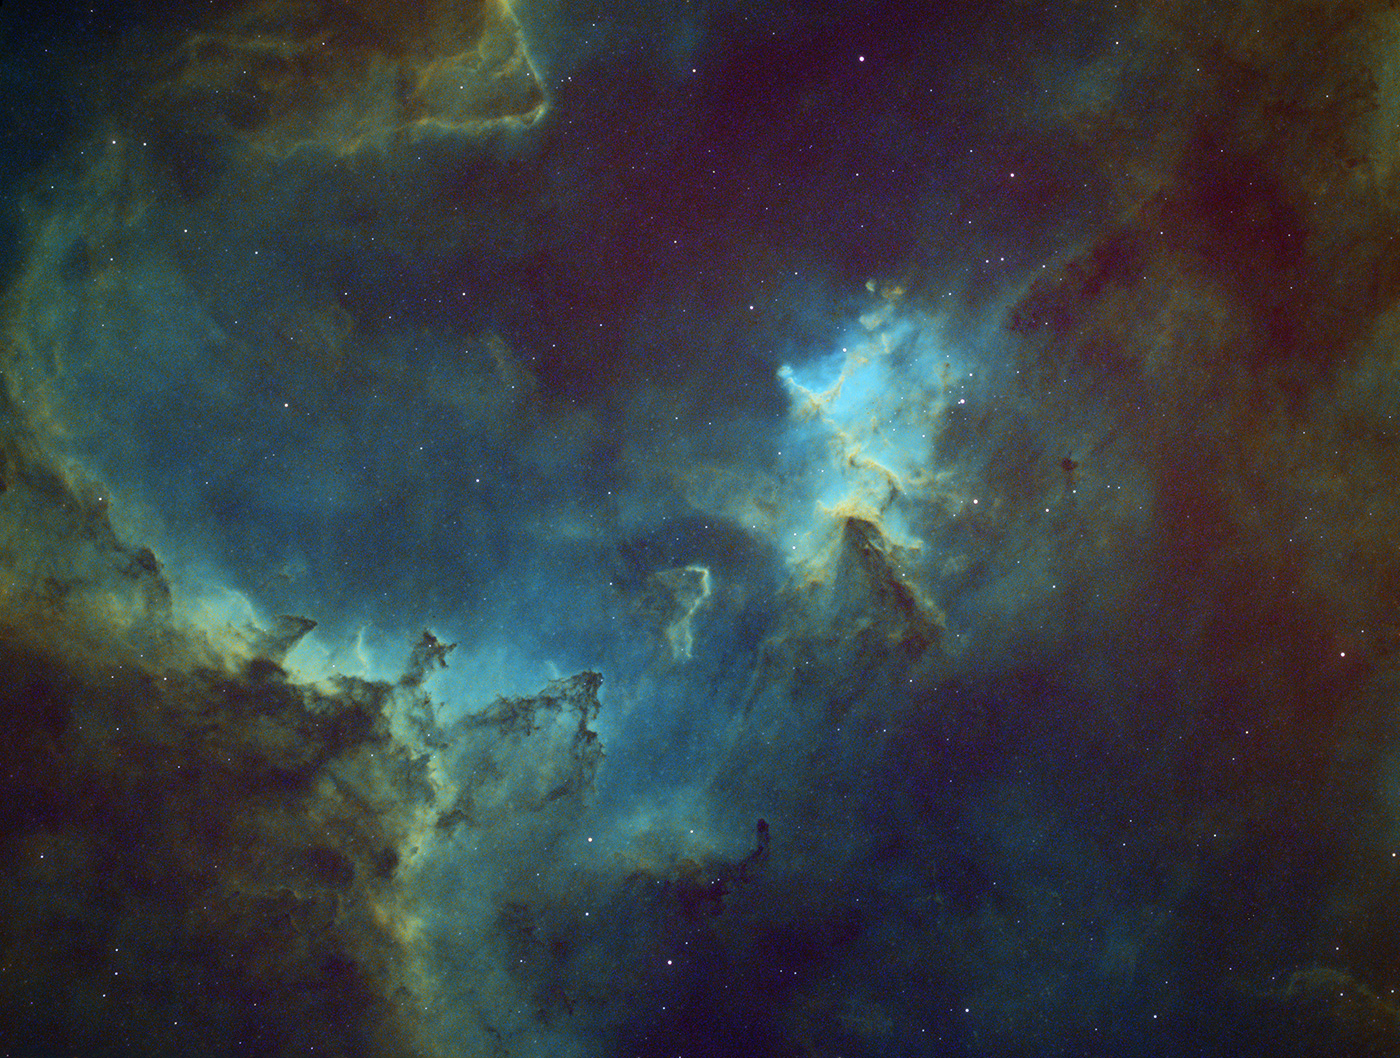
This was an adventure, and something we will most definitely attempt again!
EXPERIMENTAL
Return of the Squid
Some of you may remember last year when I attempted to capture the Squid Nebula and it didn't go very well at all. Well I have decided to re-visit this, to see if we can't do a bit better!
Mathematically isolating bandpass signals in PixInsight probably isnt the first thing that pops into your head when thinking about how best to process an image, but for me this is what I needed to be able to do in order to simulate tighter filter isolation, but at the time of this experiment I didn't know if it was possible, let alone this is a standard practice, just that I felt it might work.
The Optolong L-eNhance has a wide ~24nm bandpass around OIII (which lets in both Hb and OIII along with background skyglow), the goal is to mathematically "tighten" the OIII signal by subtracting the continuum noise and isolating the pure emission line data.
Method:
- Split Channels & Remove Stars before manipulating signal math, you must separate the emission lines and isolate the nebula background from star interference.
- Extract RGB Channels: Use ChannelExtraction (Colour Space: RGB) to separate your integrated image into R, G, and B mono images.
- Run StarXTerminator on all three individual channels so you are working strictly with the starless_R, starless_G, and starless_B frames.
- Construct the Pure OIII Signal (Simulating Tighter Bandpass) The green and blue pixels on my colour sensor both capture OIII light, but they also collect skyglow/light pollution that a narrower 3nm filter would block.
- Synthetic OIII Combination: Open PixelMath and create a synthesised OIII frame (O3_synthetic) using a weighted average:
(starless_G * 0.6) + (starless_B * 0.4)
(Note: The Bayer matrix has twice as many green pixels, so weighting Green slightly higher preserves Signal-to-Noise Ratio while incorporating the Blue channel data.)
- Continuum / Background Noise Subtraction (Simulating a Narrower Filter):A narrower filter works by blocking the off-band continuum light (light pollution).
To simulate this, I created a pedestal-subtracted continuum mask from the red channel (where Ha lives):
max(0, O3_synthetic - (med(O3_synthetic) * 0.8))
What this does: It clips the bottom 80% of the baseline background pedestal without touching the peak OIII signal, simulating the background-suppression effect of stepping down from a 24nm bandpass to a ~3nm-5nm bandpass.
- Enhance Signal Contrast via Multiscale Processing to make the faint Squid "tentacles" jump out as if captured with an ultra-narrow filter.
- Multiscale Linear Transform (MLT): Apply MLT on the O3_synthetic image.
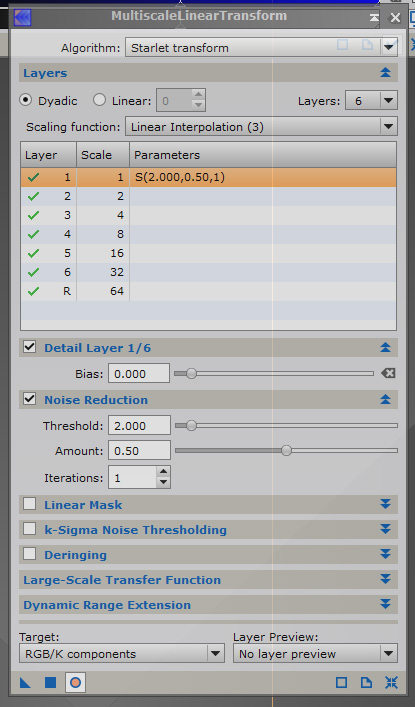
3. Boost layers 3, 4, and 5 slightly while applying light noise reduction on layers 1 and 2.
4. This isolates medium-to-large faint nebulosity structures (like Ou4) while suppressing fine pixel noise.
5. Apply an S-curve targeting the mid-tones on the extracted OIII map.
6. Because we subtracted the continuum floor earlier, we should be able to stretch the Squid aggressively without blowing out the sky background.
7. Recombine as HOO Matrix - Recombine clean Ha (starless_R) and newly simulated "narrowband" O3_synthetic using PixelMath:
Red: starless_R
Green: O3_synthetic
Blue: O3_synthetic
This will give you a sharp HOO composite where the H-alpha Flying Bat stays rich and red, while the Squid appears as a distinct, high-contrast teal/cyan structure with a significantly darker background sky floor than the native L-eNhance capture.
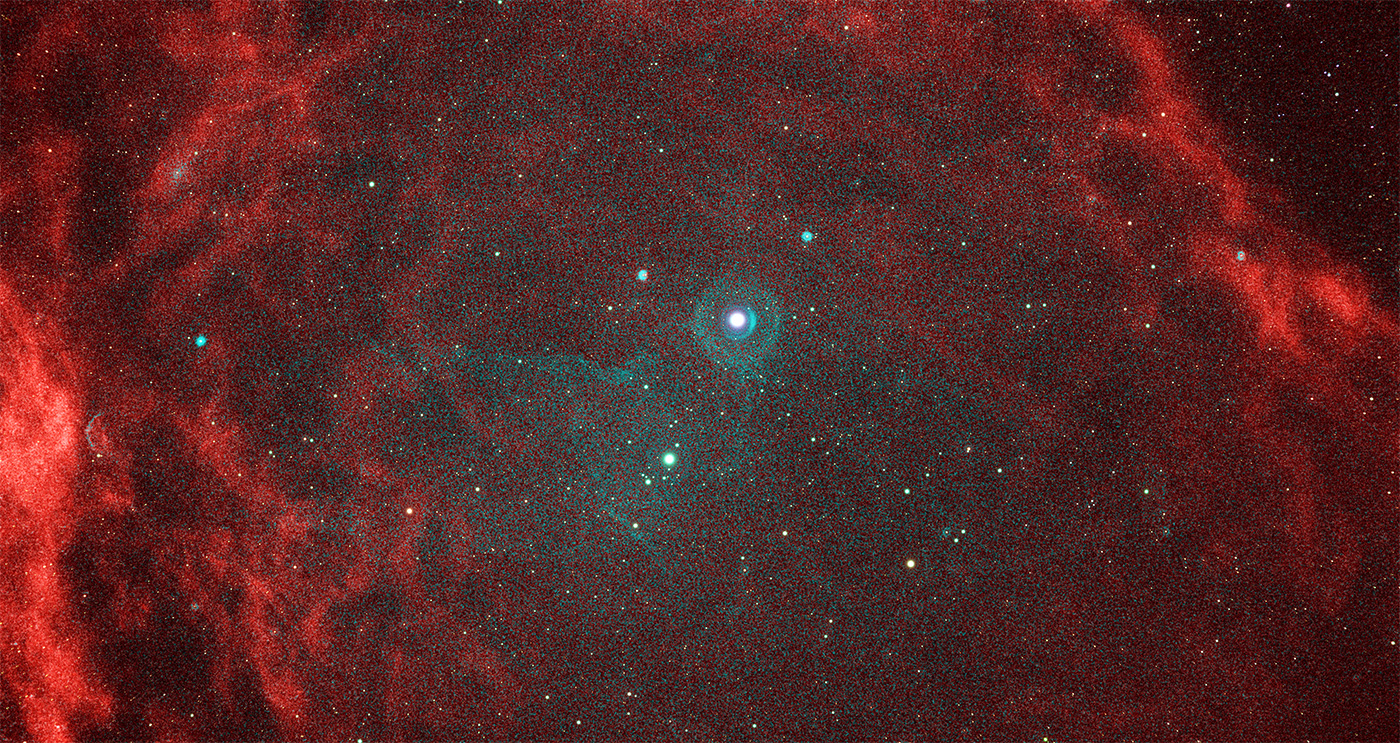
As you can see it worked, well, in the sense that we were able to extract a much narrower band of OIII than our filter allowed... but as you can also see 3 hrs of data in a Bortle 4 is no way enough to bring out the squid... but I shall keep adding more data and see if we can't get a much better image!
DBXtract and AutoPalette Studio (Pixinsight)
As I mentioned above, I have since learnt that this is common practice, to artificially narrow the bandpass through maths. A fellow Astro nerd by the name of Richard Fuller, very kindly pointed out that a company called Astrocitas have written a tool that does just this called DBXtract, along with AutoPalette Studio form a very powerful addition to Pixinsight to do exactly what I was looking for!
Here is an article they wrote about the tool.
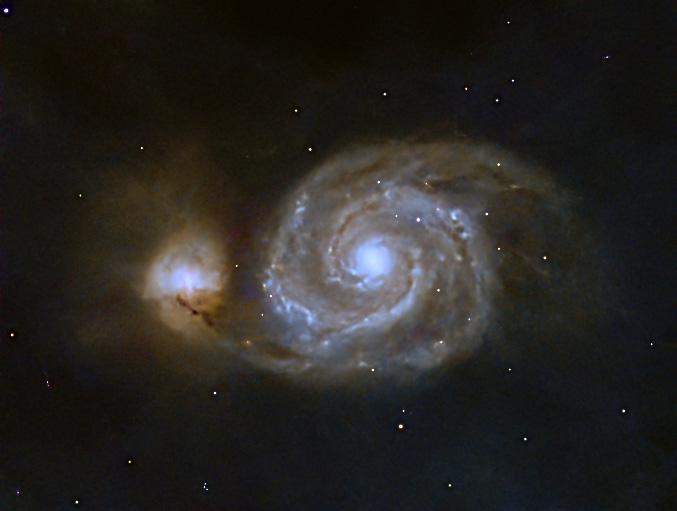
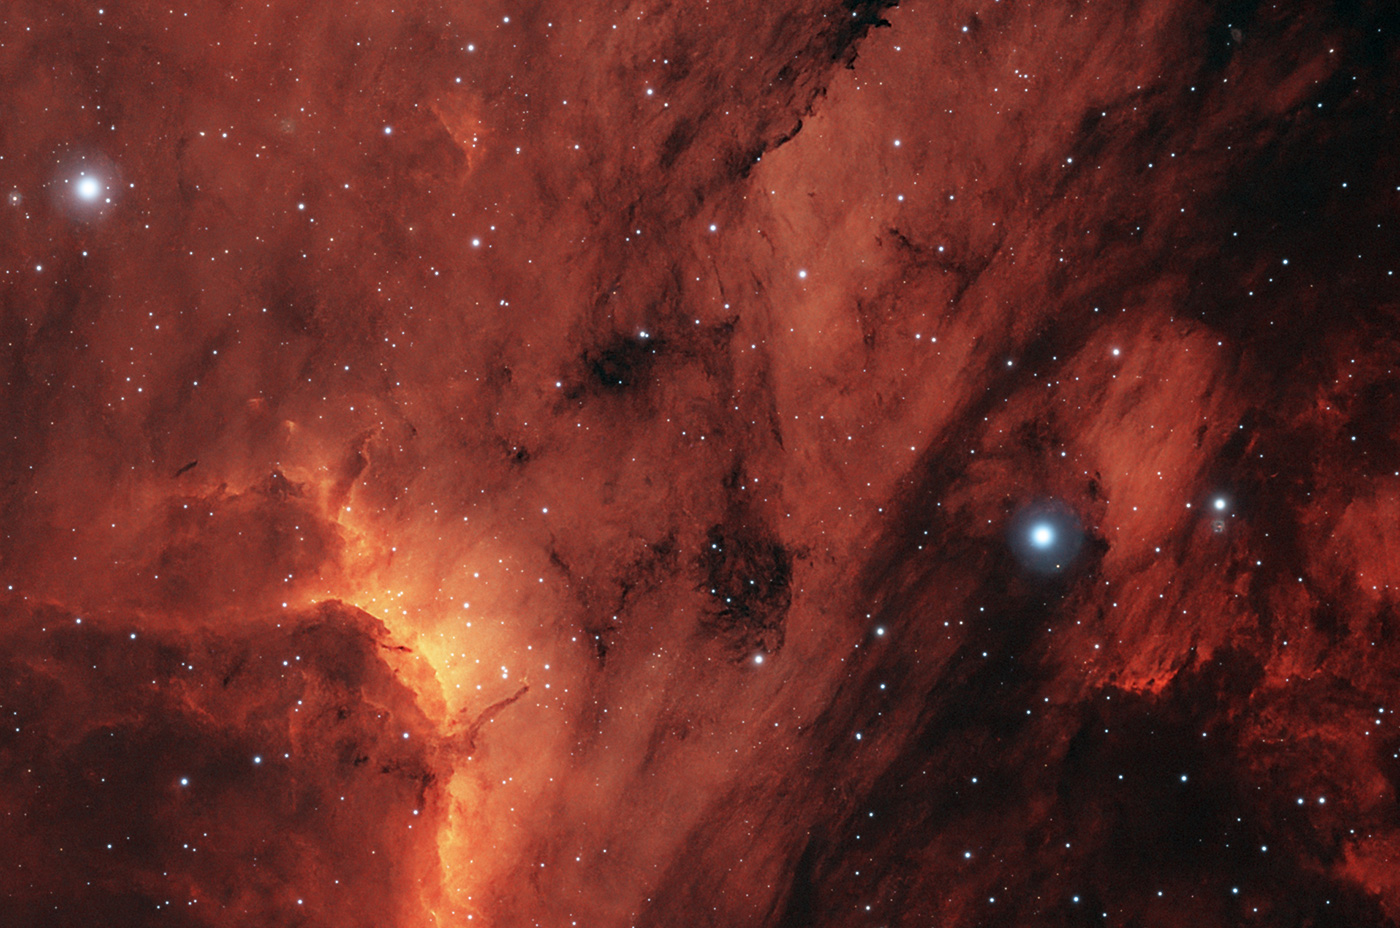
This is 1000 times better than my maths, and the results are truly amazing. The AutoPalette tool gives you the ability to quickly switch your images to different palettes like SHO to Forexx OSH, or whatever you fancy... it is very impressive and I couldn't resist re-processing some old data to put it through its paces
IMAGES
Solar System
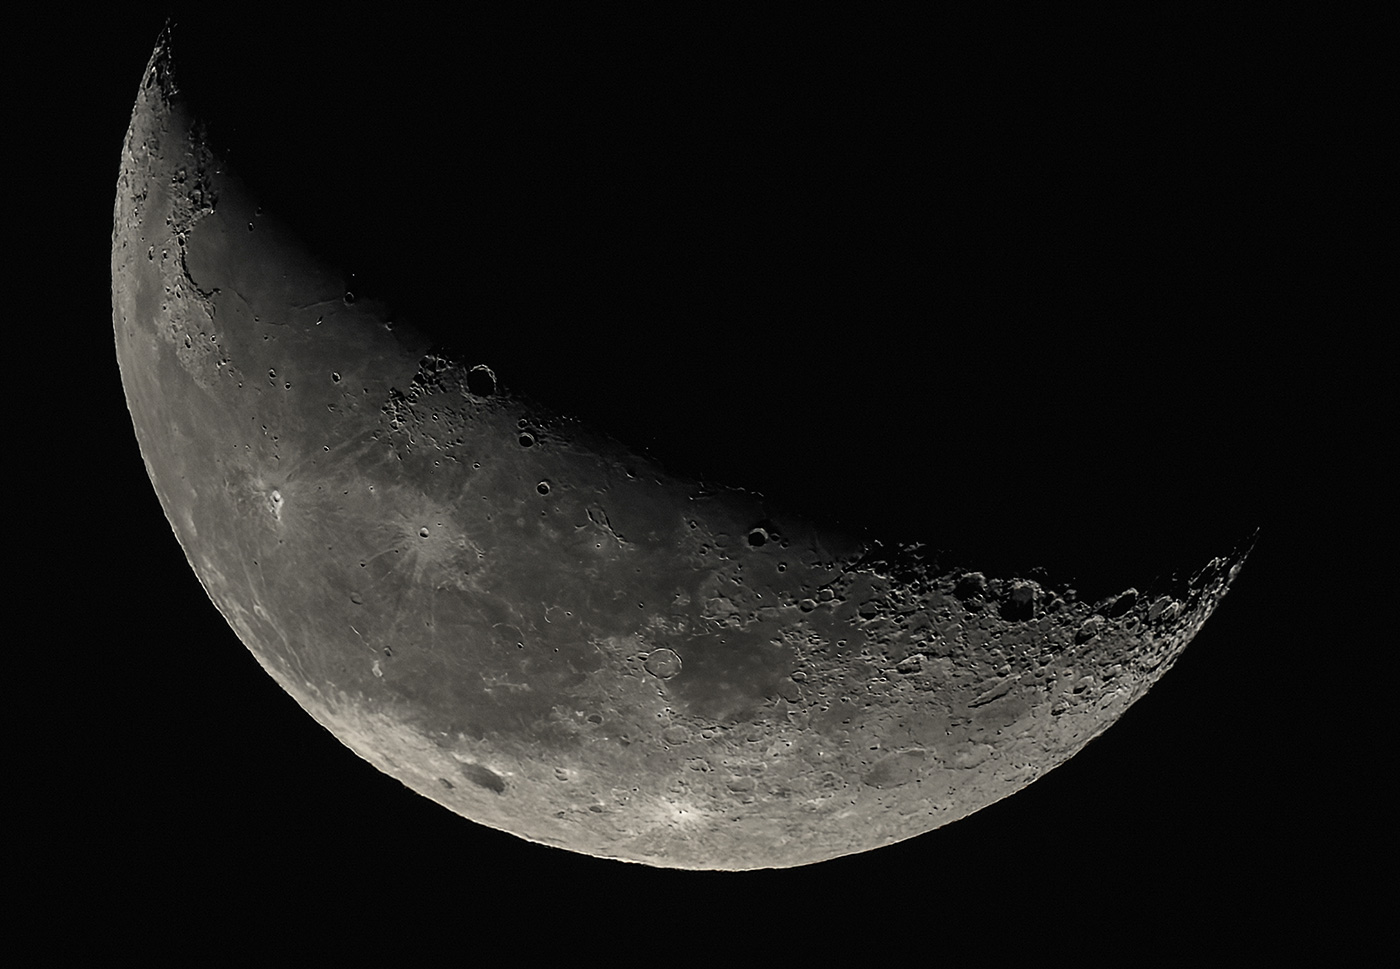
Moon
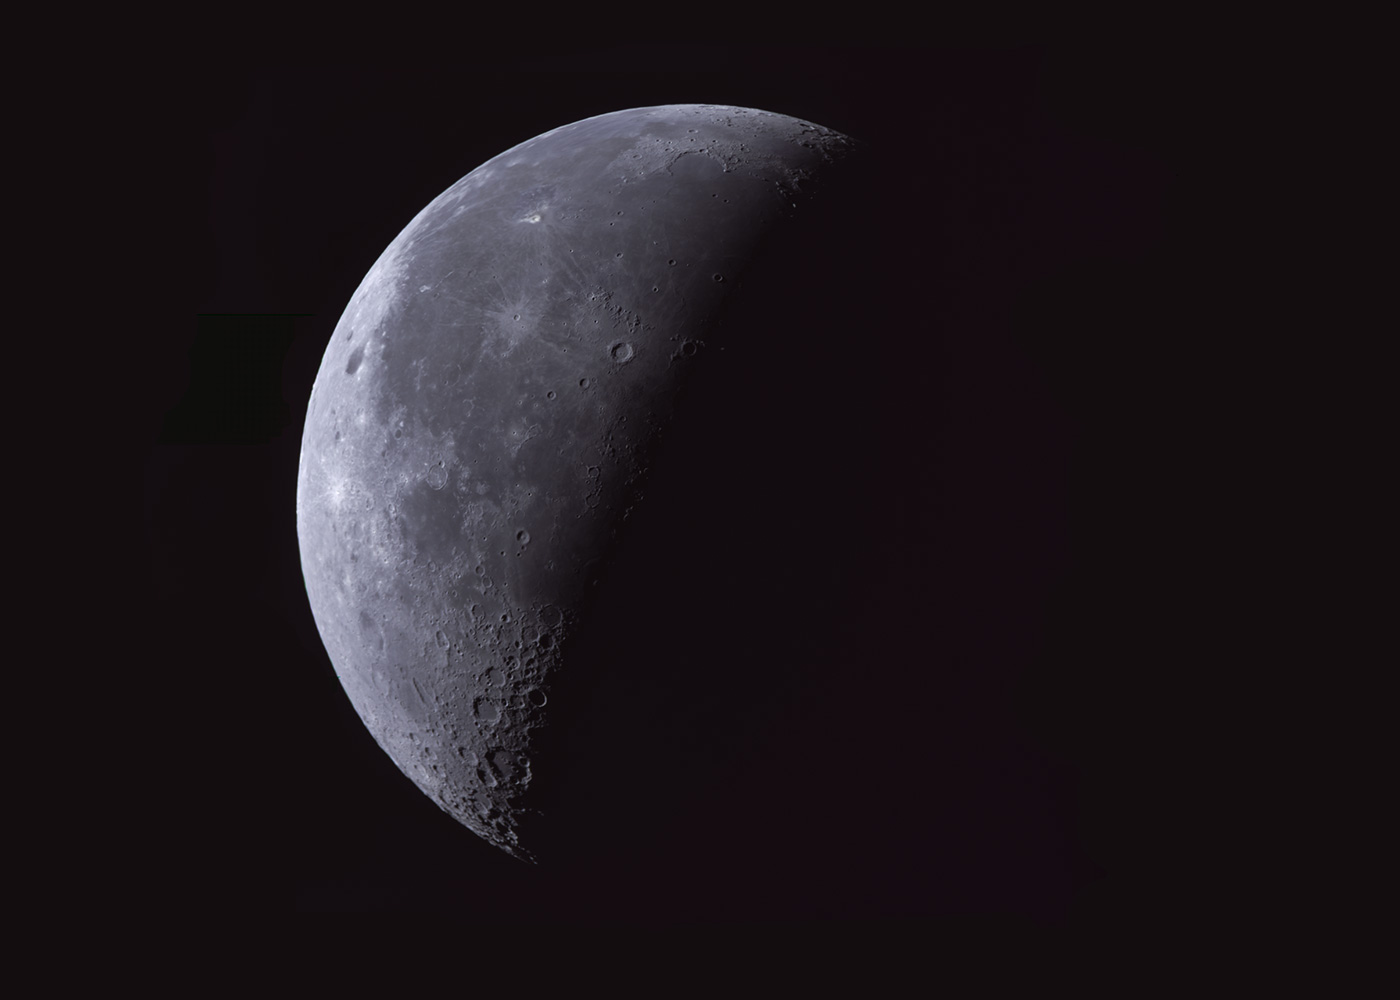
Equipment and settings:
Camera: ZWO ASI585MC Pro
Telescope: Altair Astro 70ED Telescope (420mm).
Mount: Juwei 17 Mount Similar: ZWO New AM5N Harmonic Drive AZ-EQ
Tripod: ZWO TC40
Filter: Optolong L eNhance
Guide Camera: ZWO ASI120mm-s
Guide Scope: SVBony 30mm (f4)
Computer: ZWO ASIAIR pro
Method:
Lights: 2 x 30s video, one top and the other bottom half of the moon.
Darks: 0
Flats: 0
Bias: 0
Stacked in AutoStakkert, stiched together and tweaked in Photoshop.
Saturn
Whilst my rig isn't really capable of planetary imaging, I couldn't resist giving Saturn a go the other night. It is very small in my field of view, I was amazed I could even resolve (to an extent!) the rings. But I am happy I managed to get something looking a bit like it, rather than an over-exposed mess.
Equipment and settings:
Camera: ZWO ASI585MC Pro
Telescope: Altair Astro 70ED Telescope (420mm).
Mount: Juwei 17 Mount Similar: ZWO New AM5N Harmonic Drive AZ-EQ
Tripod: ZWO TC40
Filter: Optolong L eNhance
Guide Camera: ZWO ASI120mm-s
Guide Scope: SVBony 30mm (f4)
Computer: ZWO ASIAIR pro
Method:
Lights: 10s video.
Darks: 0
Flats: 0
Bias: 0
Stacked in AutoStakkert, tweaked in Photoshop.
Milkyway
Whilst I am still researching which camera would be a suitable replacement for the 7D. I have been out with my old Canon 500D which is astro-modified, I am struggling to get the red under control, and further more any form of IR especially around CCTV cameras really impacts the image. That being said, when you spot a great location the best camera in the world is the one you have with you!
Many thanks to Nazar Kirovych for gazing at the Milky Way!
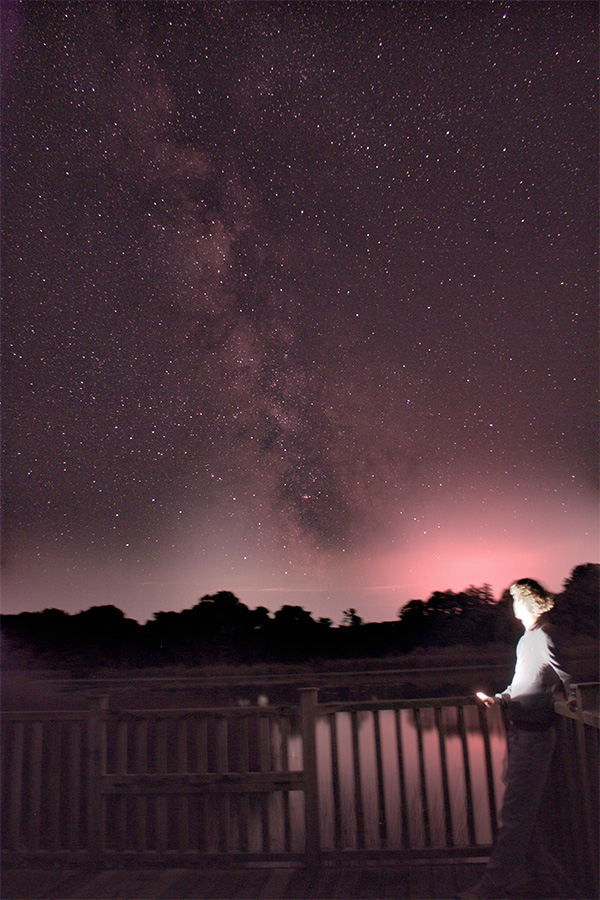
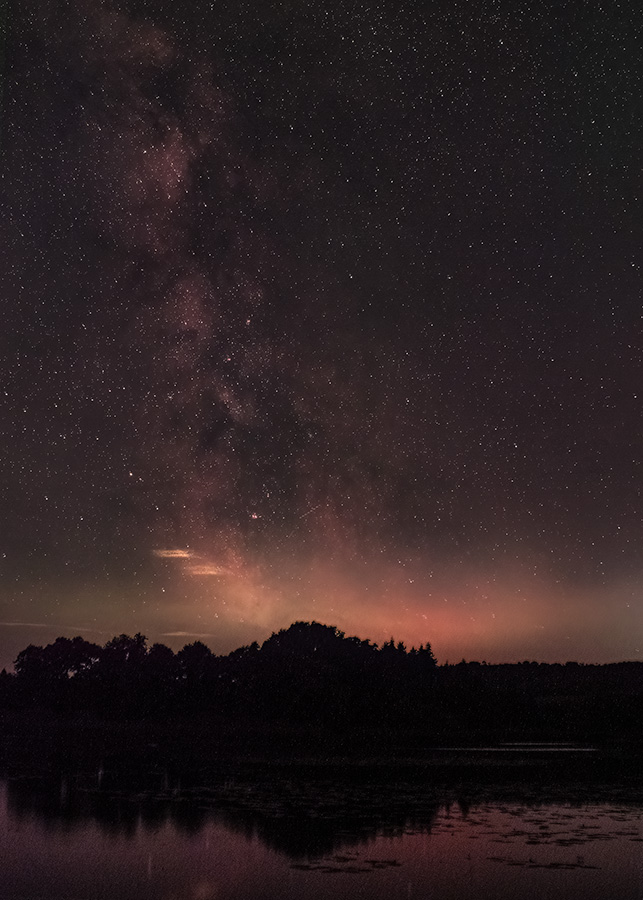
Equipment and settings (both images):
Camera: Canon EOS 500D
Lens: Canon EF-S 18-55mm IS.
Tripod: Manfrotto 290 lite
Method:
Lights: 10 x 10 secs, ISO 1600, f4 (for sharper stars).
Darks: 0
Flats: 0
Bias: 0
Stacked in Sequator, Stretched in Photoshop.
Deep sky
The Crescent Nebula (NGC 6888) and Soap Bubble Nebula (Ju 1)
Both of the objects are located around 5,000 light-years away from Earth, in the constellation of Cygnus. The Crescent nebula spans a massive 25 light-years across, and was formed by intense stellar wind collisions from a dying Wolf-Rayet Star (WR 136). The bit that looks like a pink walnut is mostly Hydrogen Alpha, which is suspended in blue/green shell of OIII. This is quite the contrast to the Soap Bubble Nebula (very faint in the image, over to the right), it is almost a perfect sphere and is a planetary nebula (nothing to do with planets sadly, just a star shedding its outer layers). It is so faint it was only discovered in 2007!
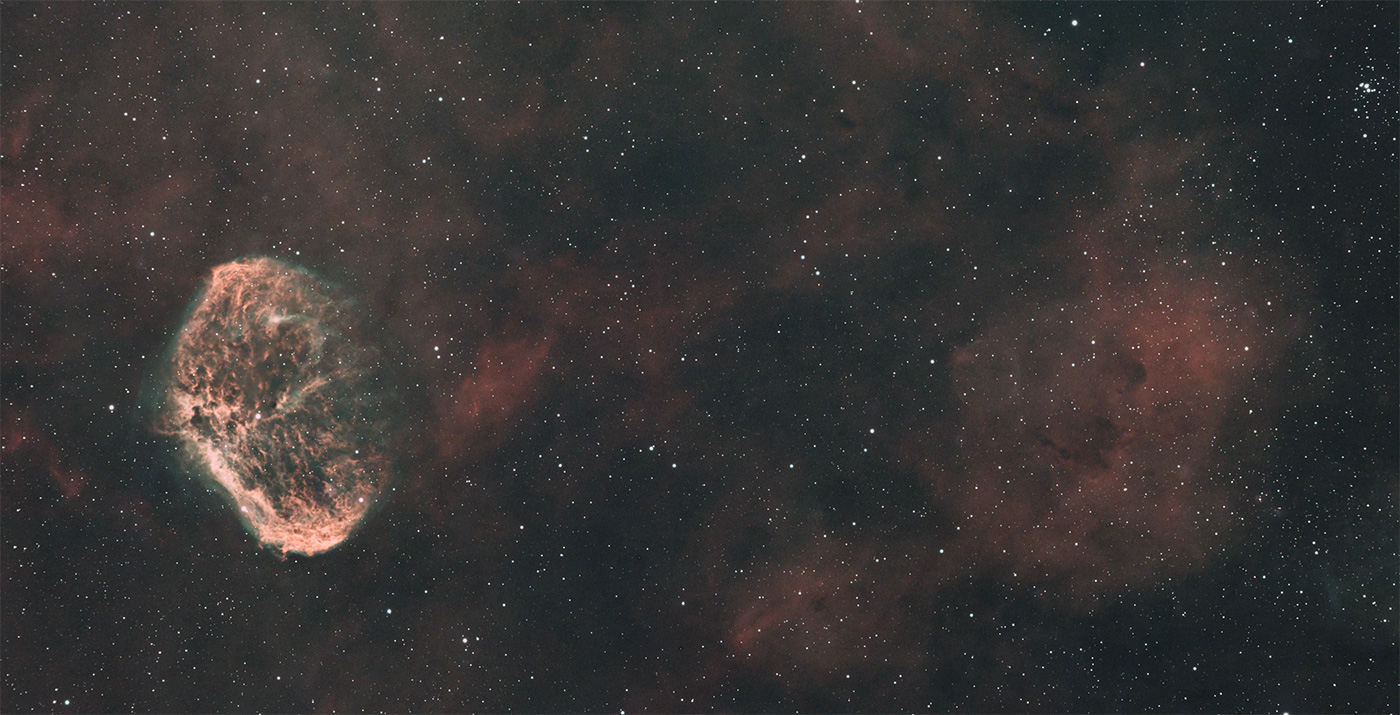
Equipment and settings:
Camera: ZWO ASI585MC Pro.
Telescope: Altair Astro 70ED Telescope (420mm).
Mount: Juwei 17 Mount
Filter: Optolong L eNhance
Guide Camera: ZWO ASI120mm-s
Guide Scope: SVBony 30mm (f4)
Computer: ZWO ASIAIR pro
Method:
Lights: 60 x 120 sec Gain 251 - Optolong L eNhance
Darks: 0
Flats: 0
Bias: 0
Stacked in DSS, Processed in Pixinsight with RC-Astro Suite of tools.
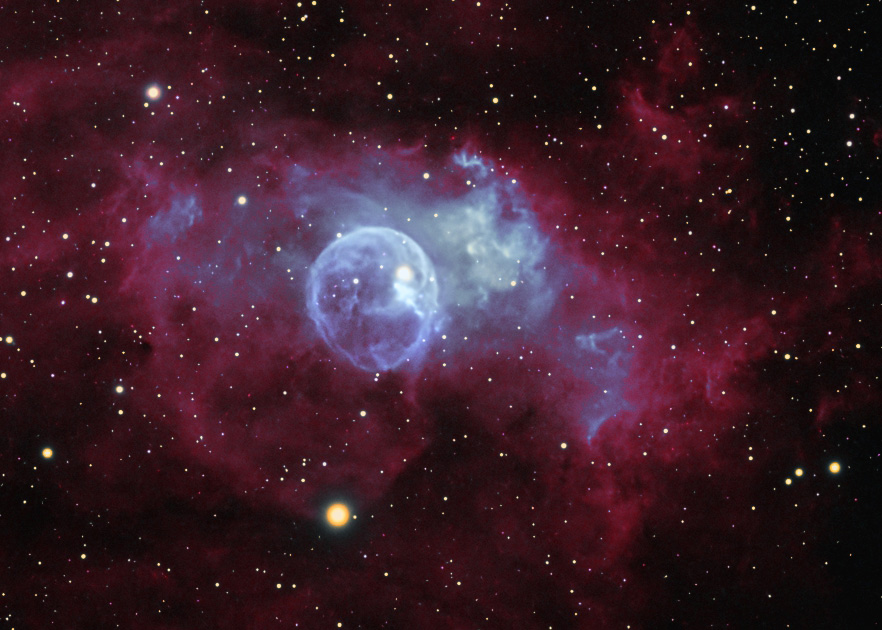
The Bubble Nebula (NGC 7635) part of the Flying Bat Nebula
Not to be confused with the Soap Bubble Nebula we have mentioned above, the Bubble Nebula is a much brighter object created by stellar wind from a young central star which causes the bubble to glow. It is much brighter than the Soap Bubble despite being nearly 2,000 light-years further away, as a massive 7,100 light-years!
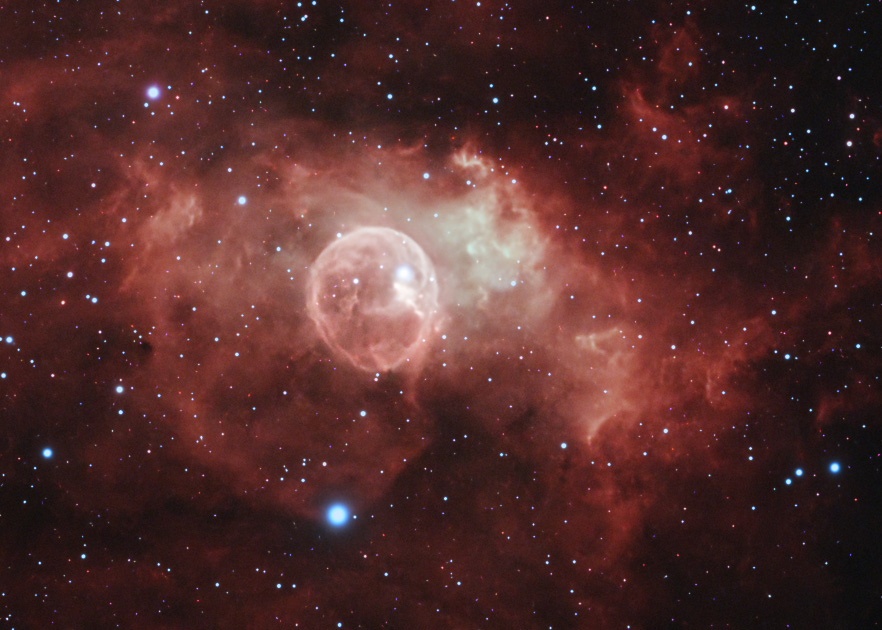
Equipment and settings:
Camera: ZWO ASI585MC Pro.
Telescope: Altair Astro 70ED Telescope (420mm).
Mount: Juwei 17 Mount Similar: ZWO New AM5N Harmonic Drive AZ-EQ
Filter: Optolong L eNhance
Guide Camera: ZWO ASI120mm-s
Guide Scope: SVBony 30mm (f4)
Computer: ZWO ASIAIR pro
Method:
Lights: 60 x 120 sec Gain 200.
Darks: 0
Flats: 0
Bias: 0
Stacked in DSS, Processed in Pixinsight with RC-Astro Suite of tools.
Share this post:
By Jonathan Penberthy on 24/09/2026

Jonathan Penberthy
Cosmic Shutter Seeker and Star Programmer
Jonathan Penberthy is the Cosmic Shutter Seeker and Star Programmer at Park Cameras, with over 20 years of experience as a software engineer. His career journey has spanned industries, but a move to Park Cameras sparked a passion for astrophotography. Jonathan’s interest began while working on a lens selection app, leading him to explore the night sky with a Canon 7D. When he’s not programming or photographing the stars, he enjoys sailing and navigating by the cosmos. Learn more on his profile page.
Trade in your old equipment
Fast and easy trade in service ensures your old gear is collected efficiently and you are paid quickly! It's very simple to trade in your unwanted photography gear. Just head over to our dedicated Sell or Part Exchange page, fill out the details, and we'll get back to you with an offer for your old gear. Take the cash, or put it towards the cost of your new gear. It's up to you! Find out more
sign up to the newsletter
Keep up to date on the latest photography news, events and offers. Sign up now